Note:The Database Manager application should be managed by a Database
Administrator.
This application is installed on the Server PC at the corporate office.
The Database application is used to create the corporate database with
the files received from the different locations. The information inside
the Database Manager will then be used by the Report manager (Analyzer)
to generate an analysis report.
This application needs to be set every time you will add a new client in
the corporate database. The data must be available in the Path data defined
in the Communication Server application.
When you start this application the following screen displays:
On the toolbar, direct functions are available depending where you are
in the application.
Open File:
This icon refers to the Open function from the File menu. It allows you
to open a configuration file of the Maitre'D Corporate Communication such
as DIVCNFG.DBF or RESTO.DBF.
Add Record:
This icon is available if a configuration file is open. This icon refers
to the Add function from the Edit menu. Enable this option when you need
to add a new record into the Database Manager.
Remove Record:
This icon is available if a configuration file is open. This icon refers
to the Remove function from the Edit menu. Enable this option if you need
to remove a record in the Database Manager.
Import:
This icon is available if a configuration file is open. This icon refers
to the Import data from restaurant function from the Edit menu. The only
time you will use the Import data function is when you start a new database
or when you add a new restaurant to the Corporate Office that does not
have the same data as the one in your current database. If the data is
the same you do not need to use the import function.
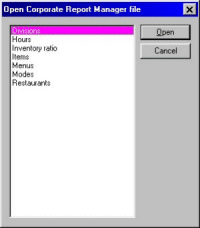
The Open option from the File menu or the toolbar allows to create or to
update the configuration files needed by the Analyzer application to generate
pre-set management reports. Make sure that you receive at least one transmission
from a restaurant and you have set the Data path field under View / Options
/ General before accessing this option.
When you select this option, the following screen displays, showing all
configuration files available. Highlight from the file desired list and
click Open to access the configuration screen of that file.
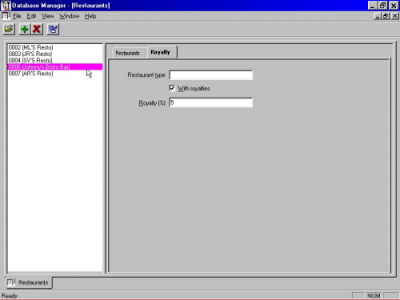
The next screen is a sample of a configuration file setup screen. When
you access this configuration screen, the left section shows you the list
of all records of the file.
For every entry listed in the left column, you need to set the following
fields (some of them are available only in certain configuration file).
To do so, first highlight the entry, then fill the fields.
Description
Enter here a description for the entry highlighted in the list of records
of the file. The default entry name is prompted in this field when you
select the entry from the list and could be used as default. This description
will be used in the analyzer application when you set and generate custom
reports.
Hours configuration file
You can use the description field to set different time ranges of the day.
If two hours have the same description, they will be compiled in the analyzer
report. For example, if you set the Hours configuration file as follow:
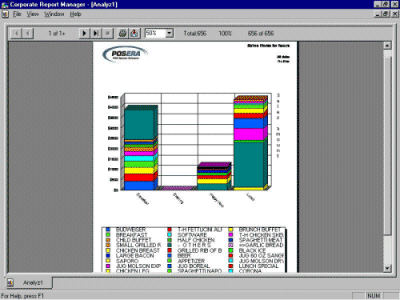
When you set reports in the analyzer application, you will be able to have
information by time range as displayed:
The time range defined previously will be displayed in four different columns.
Daily fix cost
It is available only with the Restaurant setup database. Enter here a daily
fixed cost for the restaurant unit selected.
Royalty
Restaurant type
It is available only with the Restaurant setup database. Define here a
restaurant type (one character) for the restaurant unit selected. This
field could be used to group different store such as type A, B, C (A=Fast
food, B=Fine Dinning).
With royalty
Enable this option if this entry from the database should be included in
the royalty count.
Royalty (%)
It is available only with the Restaurant setup database. Define here the
royalty percentage that should be use for the reports.
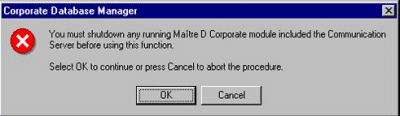
Re-Index
The only index files in the Database Manager are the Local Files (configuration
files for the Corporate Office.
The files received from the restaurant (refer to the database files structure
for a complete list) are not indexed to give you more flexibility depending
on the database tools that you want to use.
Use this option to re-index all the configuration files for the Corporate
Office. When you select this option, the following warning message will
be prompted on the screen:
After reading this warning message click OK to re-index the configuration
files.
Compact Database
The Compact database option allows to select the information that you want
to keep in the Database Manager. Depending on the number of locations
that are connected to the Communication Server and the files that they
are sending, the database will keep on getting larger each time you receive
new files. Larger database files will eventually slow down the generation
of the reports and will take more space on your hard disk. For example,
you might just want to keep the weekly summary after a year of operation.
Following is an explanation on the different compacting option that you
can use:
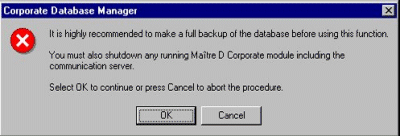
WARNING: IT IS HIGHLY RECOMMENDED THAT YOU MAKE A FULL BACKUP OF THE DATABASE
BEFORE YOU USE THIS FUNCTION. YOU MUST ALSO SHUTDOWN ANY RUNNING MAITRE'D
CORPORATE COMMUNICATION MODULE INCLUDING THE COMMUNICATION SERVER.
When you select this option, the following warning message will be prompt
on the screen:
After reading the warning message click OK to access the Compact database
option. The following screen displays
Compact Type
Apply only before
Enter the date on which the compacting should take effect. For example
to compact files up to December 31st 1997, you will enter January 1st
1998.
Cumulate
Select from the following option the compacting format you want.
We will use an example to have a better understanding of every compacting
option.
First day of the week: Monday
Week per period: 4
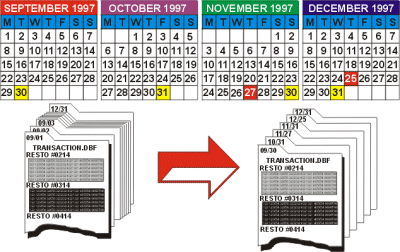
Start of year (accounting): September 1st 1997
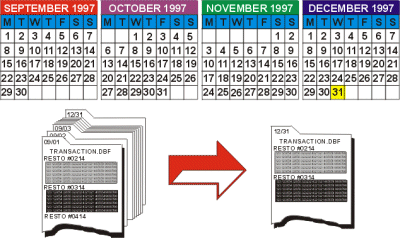
To date
Select this option to compact database information in the day before the
one that you defined in the Apply only before field. In our example, all
information will be stored into December 31st 1997 as a summary of all
information before January 1st 1998. You might want to keep available
detailed information for specific days. To do so, please refer to the
Exceptions date section later in this document.
By hour range
Select this option to compact database information by hour range. This
option will store the information total by hour range according to the
description you set in each entry of the Hours configuration file. The
information will be stored in the last hour of the range. For example,
if you set breakfast for 5, 6, 7, 8, 9, 10, the information will be store
in 10th hour. In our example, all information will be stored into every
day up to December 31st 1997. You might want to keep available detailed
information for specific days. To do so, please refer to the Exceptions
date section later in this document.
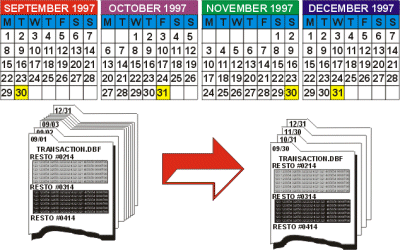
By week
Select this option to compact database information by week. The information
will be stored in the last day of the week according to the setting of
the View / Options / Period / first day of week field. In our example,
if the first day of the week is Monday, the information will be stored
in every Sunday date before December 31st and from Monday, December 29th
to Wednesday, December 31st; the information will be stored into December
31st 1997. You might want to keep available detailed information for specific
days. To do so, please refer to the Exceptions date section later in this
document.
By period
Select this option to compact database information by period. The information
will be stored in the last day of the period according to the View / Option
/ Period page settings. In our example, information will be stored in
September 28th 1997, October 26th 1997, November 23rd 1997, and December
21st 1997. And, from December 22nd to December 31st, the information will
be stored into December 31st 1997. You might want to keep available detailed
information for specific days. To do so, please refer to the Exceptions
date section later in this document.
By month
Select this option to compact database information by month. The information
will be stored in the last day of the month according to the View / Option
/ Period page settings. In our example, information will be stored in
September 30th 1997, October 31st 1997, November 30th 1997 and December
31st 1997. You might want to keep available detailed information for specific
days. To do so, please refer to the Exceptions date section later in this
document.
By year
Select this option to compact database information by year. The information
will be stored in the last day of the accounting year according to the
View / Option / Period page settings. In our example, information will
be stored into December 31st 1997 because the current accounting year
is not finish and the earliest date that we specify is December 31st 1997.
You might want to keep available detailed information for specific days.
To do so, please refer to the Exceptions date section later in this document.
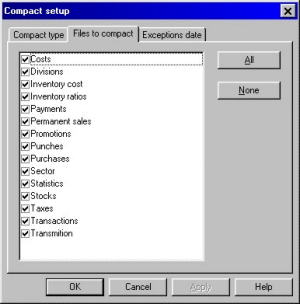
Files to Compact
Select from the list, the database file that you want to compact. You can
select specific files or all files.
All
Select the All button to select all databases.
None
Select the None button to remove all databases.
Exceptions Date
You might want to keep available detailed information for specific dates
such as New Years day or Thanksgiving. When you ask for compacting, you
can set exception dates. The database will then be compacted according
to the compacting option you choose but will not include in the compression
the days specified here. For example, you want to compact the transaction
database by month but you want to keep detail of Thanksgiving and Christmas
days. You will add here November 27th 1997 and December 25th 1997. These
dates will not be included in the summary by month of November 30th and
December 31st.
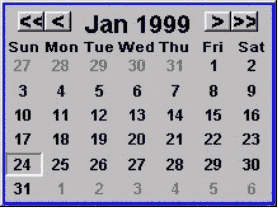
Add:
This button allows to add a new date in the exception date list. When you
select this button, a calendar will prompt you, allowing to select specific
dates you want to add in the exception list.
Remove:
This button allows to remove a date from the list of exception dates. From
the list, highlight the date you want to remove and click on the Remove
button.
Database manager : View menu
Toolbar
This option allows to choose whether to display or not the toolbar (the
icons at the top of your screens). This selection toggles from enable
and disable. When there is a check mark beside the option, the option
is enabled and you will see the toolbar.
Status Bar
This option allows to choose whether to display or not the status bar (the
line located at the bottom of your screen). This selection toggles from
enable and disable. When there is a check mark beside the option, the
option is enabled and you will see the status bar.
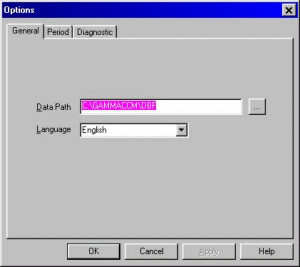
Options
General
Data path:
Enter the path where the information available for the Database Manager
application is stored.
Language:
Select from the drop down menu, the language that will be used when you
access this application.
Period
First day of week:
Select from the drop-down menu the first day of the week that will be used
in the Compact database option and in the Analyzer application.
Week per period:
Define here the number of weeks per accounting period that will be used
in the Compact database option and in the Analyzer application.
Start of year
Year, Month, Day:
Define here the first day of the current accounting year.
Diagnostic
Log enable:
Enable this option to start a log of every operation made in the Database
Manager application.
View log:
Select this button to view the detail of the log of the Database Manager
application. Following is an example of the Database Manager log.