Maitre'D certifies the EPSON Ethernet III Connect-It Module with the following
EPSON printers: TM-T88II / III and TM-U220.
Setting DIP Switches
For DIP switch settings for Baud rate and data buffer, refer to the printer
manual and to the EEI module documentation supplied by EPSON, and found
at; http://www.pos-connect.com/e3/e3.html
Note: For the EPSON TM-88IV IP printer, Dip Switch 8 on Switch Bank
2 needs to be ON, with all other dip switches OFF.
Both the EIII module and printer must have matching baud rates of 9600,
19200, or 38400 to communicate. Set DIP switches as necessary, and run
a configuration report that shows that the printer, module, and firmware
are working correctly as well as how the communication parameters are
set.
Note: Default communication parameters are:
9600 baud, 8 bits, 1 stop, no parity, and 4K buffer.
Running a Configuration Report
To generate a configuration report with the Ethernet-III, either have SW-1
on (on the EEI-III) when the printer is powered on, or click on the "Test'
button in the eeiutil.exe EEI printer discovery and configuration
program supplied by EPSON, and also found at; http://www.pos-connect.com/e3/e3.html
Factory Settings
Each EEI module has a 'Base' Ethernet Address programmed into the Serial
EPROM. A unique Ethernet Address and Serial Number are programmed into
the EEPROM at the factory, and cannot be changed. Labels with both the
Ethernet address and serial number are affixed to the module. These numbers
are important when configuring the EEI – Make a note of these values in
a secure place.
Configuring the Interface
Configuration
of this module should only be attempted by a qualified network administrator.
Use eeiutil.exe to find all EPSON Ethernet printers on the network
and test and configure them.
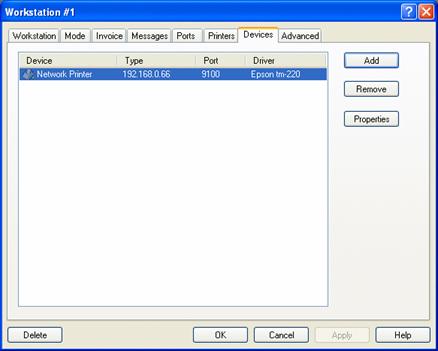
P.O.S. Control / Workstation / Options / Devices
Note: This printer will be considered as a peripheral of one workstation,
even though it is not physically connected to any workstation, but to
a central hub.
Define that printer as a device of one workstation. This workstation will
be responsible to handle all communications with that printer.
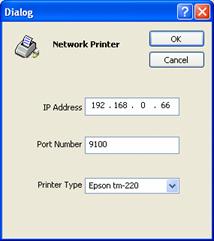
Click on the Add button, and setup the IP Address ands Printer Type.
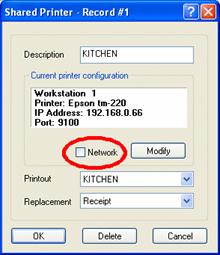
P.O.S. Control / Shared Printer
Define that printer as a shared printer. DO NOT enable the "Network"
option in average to high volume locations.
Note: We do NOT recommend enabling the Use Folder Share For Printing
option in any of your terminals in P.O.S. Control / Workstation / Options
/ Advanced
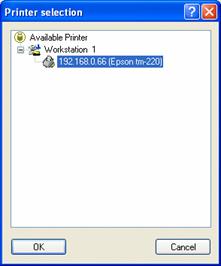
Click on the Modify button, to select the printer from the list of printers
defined on workstations.