Boot the system on which you want to install the Maitre'D software.
Once the system has booted up to Windows shell, insert the Maitre'D
CD in the CD ROM drive.
If you do not see the Maitre'D installation screen, click on Run
from the Start menu. Here, we assume your CD drive is D:\, then type D:\Autorun.Exe.
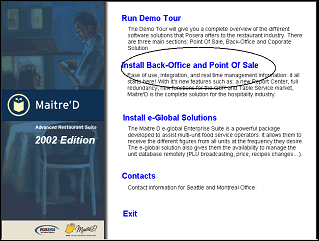
The Maitre'D installation screen appears as shown in figure1. If you are
using a different drive, you can hit the browse button and select your
CD drive from there.
To install the Maitre'D 2002 Back-Office software, select "Install
Back-Office"
Then select "Install Main Back-Office
Note: If
you are not installing from a CD, but from a downloaded version, navigate
to the disk1 directory, and start the following application;
Setup.Exe
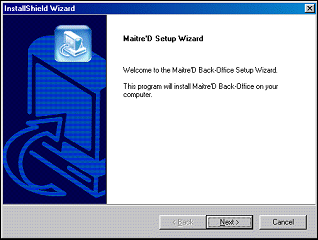
Read the instruction and click on Next. The installation program
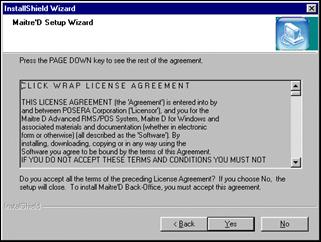
verifies the hard disk(s) installed on your computer and then displays
the LICENSE AGREEMENT ; You have to read the license agreement and accept
its terms to proceed with in the installation process of Maitre'D. To
agree click on Yes.
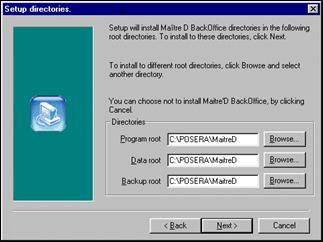
The setup program installs the Maitre'D Back-Office
directories in the following default root directories C:\Posera\MaitreD.;
This default value is used for the program root, Data root and Backup
root. To accept those values, click on the Next button and the installation
program will create the following directories: C:\Posera\MaitreD\Backup
C:\Poisera\MaitreD\Data and C:\Posera\MaitreD\Prg.
It is recommended to use the same directory for the Program root and
the Data root. You might have to use different directories if you install
the software on a file server and want different Back-Office station to
share the same data. If so, the Program root could be installed locally
on each Back-Office station for optimal performance and the Data root
could be install on the file server.
Shows up only if you are doing a new installation. If the screen
is different you are probably doing a software upgrade, please refer to
the appropriate section of this manual.
Software Upgrade to be verified
If you are upgrading a previous version of the Maitre'D software, the
installation program detects the current installation on your computer
and prompts you before upgrading it.
New Installation
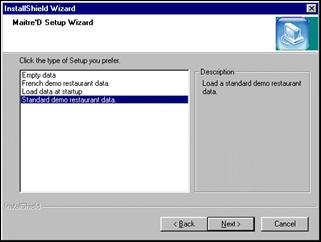
If you are installing the Maitre'D software for the first time, the
installation program will display a screen as shown below. If you are
doing a software update, you will not see this screen and the installation
program will take to the next step.
Select "Standard demo restaurant data" to install a database
already programmed with all Maitre'D features. It is recommended that
you select this data if you are a new user. Select "French demo restaurant
data" to install the French demo database, select "Empty data"
to install an empty database or select "Load at Startup" to
install your own database during the installation process of the software.
Click Next to continue
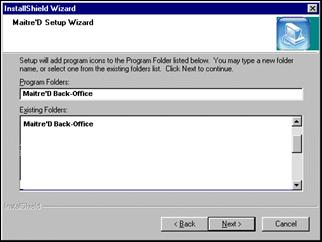
The Maitre'D installation program automatically creates a Maitre'D
program folder. Click the Next button to continue.
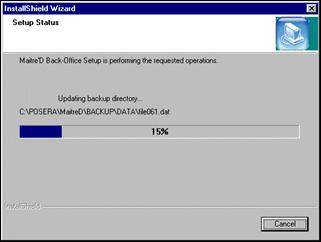
The installation program begins copying the files
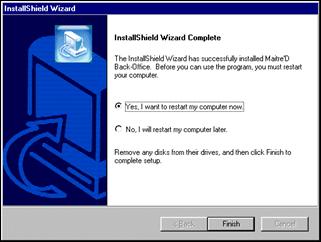
Once the installation is completed, you will need to restart your
computer for settings take effect. Click on Finish to restart the computer.
Once the software is installed the installation wizard will prompt
to reboot the computer.
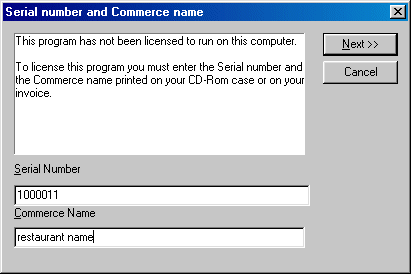
After the computer has rebooted, you will need to license the program.
Enter the serial number and the commerce name printed on the CD-Rom case
or on your invoice provided by Posera, XX click next to continue.
The system will prompt to the request key code screen, read the
message and print the form that you will email to support@posera.com or fax to Posera at (514)499-9951
attention of support. Click next.
Enter the key code number provides by Posera. Click next to continue.
A congratulation message will display as shown below. Click yes
to finish the installation process and to restart your computer.
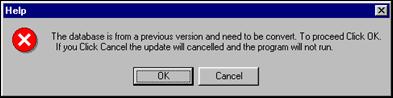
Once and your on your Windows shell, the Software asks to update
the database, click on "Proceed". Maitre'D will convert automatically
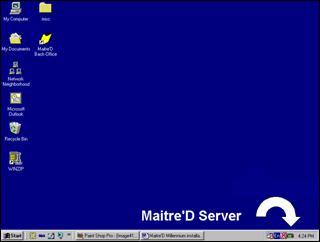
the database. Once the update is completed, you will notice a Maitre'D
Server icon installed in your task bar .
If you selected the"Load at Startup" option, the restoration
of your database will ask to enter your first backup disk and will take
you step by step to the full recovery of your database. You might need
to perform a Control Update at the end of the restoration. To do so, start
the Maitre'D Back-Office, enter your password and under the Server Control
module select Tools / Control Update. If you are not familiar with the
procedures on how to access Maitre'D Back-Office, refer yourself to the
"Access the Maitre'D Back-Office Software". If you do not see
the Maitre'D Server icon on your task bar, please select from the Server
Control module File / Start server.
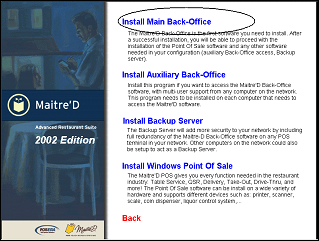
The Maitre'D Server takes care of all communications between the workstations
and the Back-Office computer. The installation program automatically places
the Maitre'D Server program in the Start Up Group. It should always be
in the Start Up group so when the Back-Office computer boots up; the communication
with the workstations becomes available.