The Accounting Interface module option from the Maitre'D Desktop allows
to import a Chart of accounts created in QuickBooks, and create daily
deposits files that can be exported to QuickBooks. Every P.O.S. divisions,
discounts, taxes, media types and Inventory categories, are linked to
accounts.
Accounting Interface Software requirement
From POSERA, you need to purchase the Accounting Interface in order to
interface with QuickBooks. Of course you will need QuickBooks as well.
Two other accounting interfaces are available: Accounts
Payable and Accounts Receivable. The Accounts Payable interface works
in conjunction with the Inventory Purchase module. These two later interfaces
will be described in other sections.
Accounts Receivable Interface Overview
The Accounts Receivable Interface module from the Maitre'D Desktop allows
to close a customer check in a customer receivable account. The Accounts
Receivable Interface option allows to link these charges to Accounts Receivable
in QuickBooks.
IMPORTANT: When setting up a Receivable account in QuickBooks, do NOT
make it a Receivable account type, but rather a Revenue.
From POSERA, you need to purchase the Accounts Receivable Interface and
the Accounting Interface in order to interface with QuickBooks. Of course
you will need QuickBooks as well.
Note: You do not need the Accounts Receivable module when using QuickBooks.
Accounts Payable Interface Overview
The Purchase option of the Inventory module from the Maitre'D Desktop allows
to enter the invoices of items received from your suppliers. The Accounts
Payable Interface option allows to link these invoices to Accounts Payable
in QuickBooks.
IMPORTANT: When setting up a Payable account in QuickBooks, do NOT
make it a Payable account type, but rather an Expense.
Accounts Payable Interface Software requirement
From POSERA, you need to purchase the Inventory Management, Accounts Payable
Interface and the Accounting Interface in order to interface with QuickBooks.
Of course you will need QuickBooks as well.
Sequence of events to synchronize Maitre'D and QuickBooks
The following document will show you, step by step, in detail, how to set
up the Accounting Interface modules.
ATTENTION: It is very important to follow the correct sequence of events
for setting up the system in order to insure integrity of the information
that will be exported. The accounts (and customers) must first be created
in QuickBooks and only then imported into Maitre'D.
Setup Accounts in QuickBooks
Export Chart of Accounts from QuickBooks towards
Maitre'D
Setup Customers in QuickBooks (for Accounts Receivable
interface only)
Export Customer List from QuickBooks towards Maitre'D
(for Accounts Receivable interface only)
Link Accounts Payable to Maitre'D suppliers for Accounts
Payable interface only)
Set Receivable in Server Control (for Accounts Receivable
interface only)
Set Receivable in Employees (for Accounts Receivable
interface only)
Import Daily Deposit Files of Maitre'D into QuickBooks
Setup accounts in QuickBooks
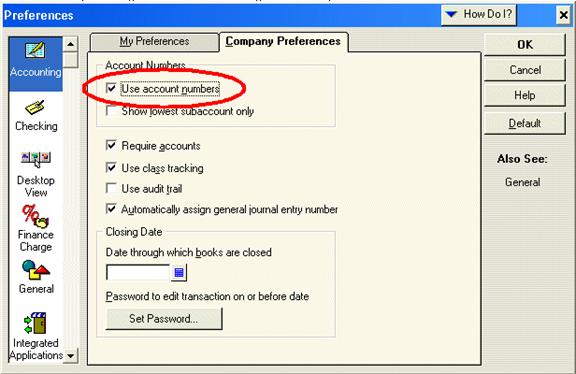
You need to configure QuickBooks to use "Account Numbers".
Edit / Preferences / Accounting
Select the option Use Account Numbers, and then click OK.
To setup the actual accounts, refer to your QuickBooks documentation.
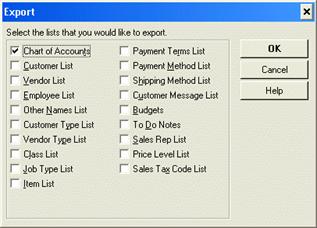
Export Chart of Accounts from QuickBooks.
In QuickBooks, select the following menus:
File / Utilities / Export
Note: You need to export files one at a time.
Chart of Accounts:
To export the General Ledger accounts, select Chart of Accounts.
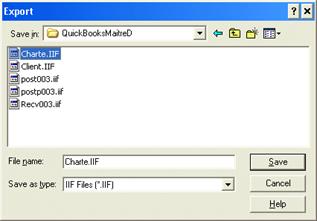
Then, copy the files to a path later programmed in Maitre'D
Example C:\QuickBooksMaitreD and name it Charte.IIF.
Import Chart of Accounts into Maitre'D.
The next time you access the Accounting Interface in Maitre'D,your accounts
chart will be automatically imported into Maitre'D.
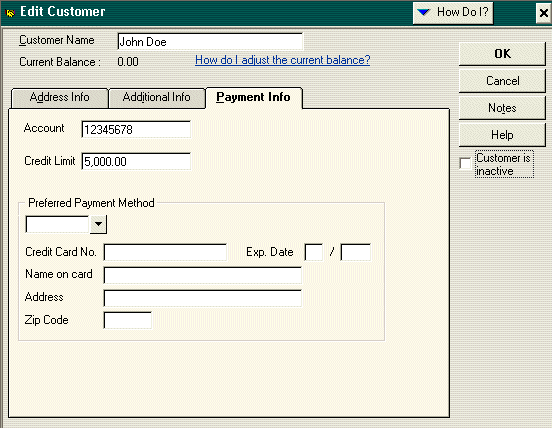
Setup customers in QuickBooks (for Receivable only)
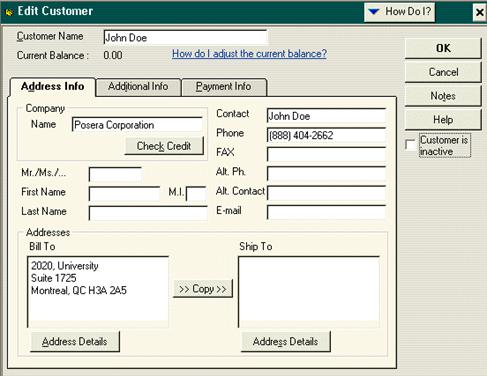
Customer
Enter the name for this customer.
Company Name
Enter the name of the company in this section.
Contact
Enter the contacts name.
Phone
Enter the contacts phone number.
Addresses, Bill To
In this section, enter the address the billing will be sent to. Only the
last 3 lines will be exported to Maitre'D
Customer Inactive
Enable this option to make this customer inactive, so it will not be transferred
into Maitre'D.
Account
Enter the customers account number. There can be a maximum of eight (8)
numerical characters only. This number will be used in Maitre'D, as a
clients code (BTREE).
Credit Limit
Enter the customers credit limit.
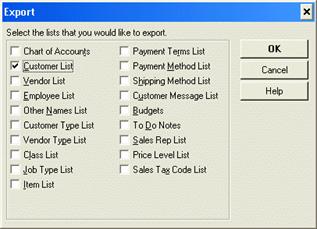
Export Customer List from QuickBooks
In QuickBooks, select the following menus:
File / Utilities / Export
Select Customer List:
Enabled
Note: You need to export files one at a time.
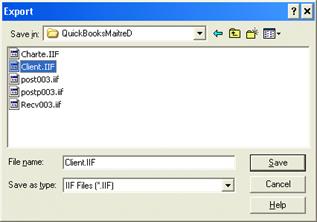
Then, copy the files to a path later programmed in Maitre'D.
Example C:\QuickBooksMaitreD, and name it Client.IIF
Import Clients into Maitre'D.
The next time you access Maitre'D's Accounting Module,the Clients will
be imported into Maitre'D.
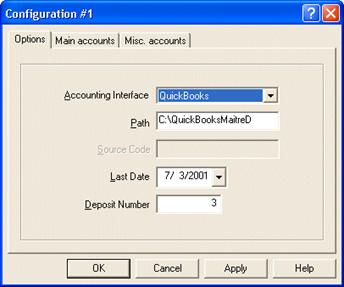
Accounting Interface / View / Options
This option allows to program the basic accounts of the accounting Interface.
When selecting it, the following screen displays:
Accounting Interface
Select QuickBooks from the drop-down menu.
Path
When you perform a daily deposit, the system will create an export file.
Enter the path where you wish to store this file
Example: C:\QuickBooksMaitreD.
Last Date
This shows the last day for which the daily deposit was done.
Note: Enter the previous day when setting the accounting interface
for the first time. The deposit date must match the last date for Account
Receivable information to be exported.
Deposit Number
This is the number of the last Daily Deposit sent to QuickBooks.
Note:Enter 0 when setting the accounting interface for the first time.
ATTENTION: After setting the Accounting Interface Options for the first
time, exit and re-enter the Accounting Interface module, to insure all
data exported from QuickBooks will be imported in Maitre'D.
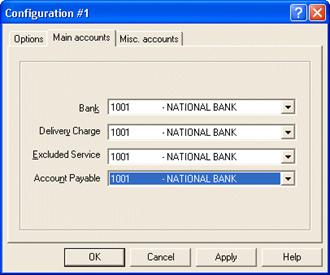
Accounting Interface / View / Options / Main Accounts
Bank
Select from the drop-down menu, the main bank account. When doing a Daily
Deposit, the deposited amount will be posted there.
Delivery Charge
Select from the drop-down menu, the account which delivery charge will
be posted to.
Excluded Service
Select from the drop-down menu the account the excluded service will be
posted to.
Accounts Payable
Select from the drop-down menu the first Accounts Payable account number.
ATTENTION: Make sure that the Account Payable field points to the same
account as the one chosen in the Bank drop-down list, above, on the first
line.
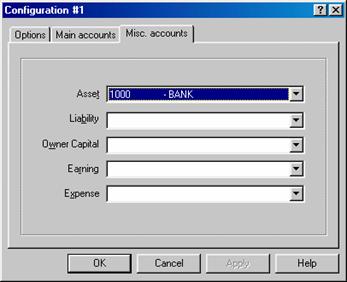
Select from the drop-down menu the Asset account number.
Liability
Select from the drop-down menu the Liability account number.
Owner Capital
Select from the drop-down menu the Owner Capital account number.
Earning
Select from the drop-down menu the Earning account number.
Expense
Select from the drop-down menu the Expense account number.
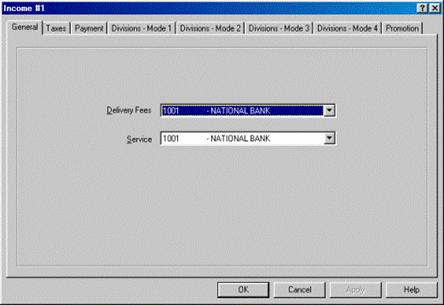
Accounting Interface / Account / Income / General
This option allows to set the incomes. For each P.O.S. Revenue Center,
you have to link an account to every taxes, payments, divisions and promotions
use. When you select this option, for each menu, the following screen
displays:
Delivery Fees
Select from the drop-down menu the account that you wish Maitre'D to use
for Delivery Fees.
Service
Select from the drop-down menu the account that you wish Maitre'D to use
for Service.
Accounting Interface / Account / Income / Taxes
Each tax needs its own account number. To configure a tax, highlight to
select it, and click on MODIFY. Once done select from the drop-down menu
the Account Number wanted.
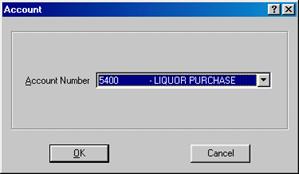
Account Number
Select from the drop down menu the Account Number that represents the tax
in QuickBooks.
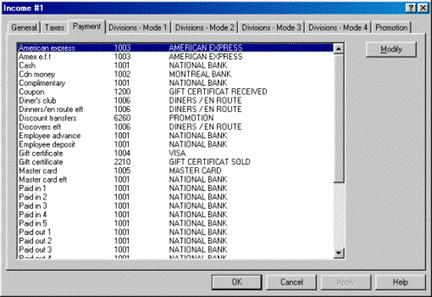
Accounting Interface / Account / Income / Payment
Each payment used needs an account number. To configure a Payment account,
highlight to select it and click on MODIFY. Once done, select the account
from the drop-down menu.
Account Number
Select from the drop down menu, the Account Number that will represent
the media type in QuickBooks.
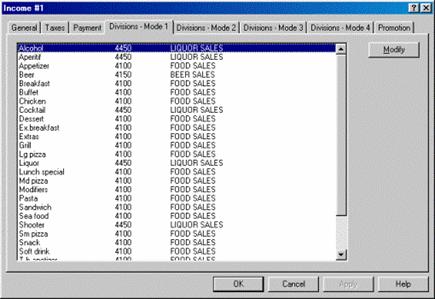
Accounting Interface / Account / Income / Divisions - Modes
For each Division - Mode page, select an account number. To configure a
Division, highlight to select it, and click on MODIFY. Once done, select
the account from the drop down menu.
Account Number
Select from the drop down menu, the Account Number that will represent
the division in QuickBooks.
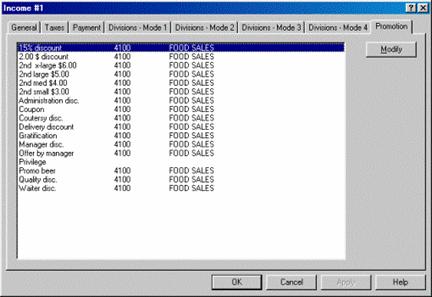
Accounting Interface / Account / Income / Promotion
For each Promotion, select an account number. To configure a Promotion,
highlight to select it, and click on MODIFY. Once done, select the account
from the drop down menu.
Account Number
Select from the drop down menu, the Account Number that will represent
the division in QuickBooks.
Expenses (for Payable only)
This option allows to configure the Expenses. For each Inventory location,
you have to link an account. When selecting this option, the following
screen displays:
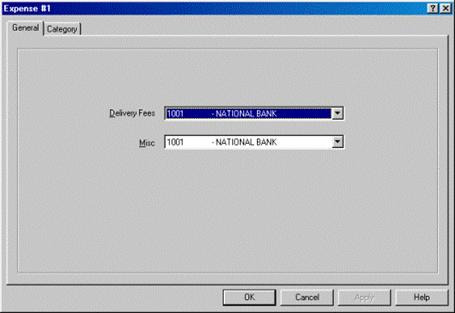
Accounting Interface / Expenses / General
Delivery Fees
If charging delivery fees in your Delivery configuration, select from the
drop-down menu the appropriate account.
Misc
From the drop-down menu, select the account that the miscellaneous charges
will be posted to.
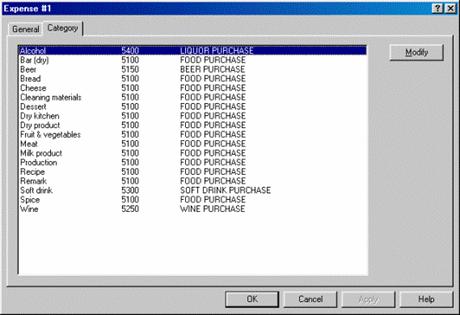
Accounting Interface / Expenses / Category
For each Category, select an account number. To configure a Category, highlight
to select it, and click on MODIFY. Once done, select the account from
the drop down menu.
Account Number
Select from the drop down menu, the Account Number that will represent
the category in QuickBooks.
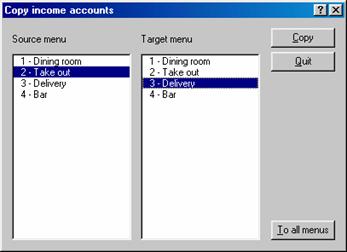
Copy Income Accounts
Once configured the income accounts and linked them to the corresponding
taxes, payments, divisions and promotions in the P.O.S. Revenue Center,
you can use this feature to copy the information to additional Revenue
Centers (Menus).
Source Menu
Select the menu where you linked the accounts.
Target Menu
Select the menu where you wish to copy the information.
Click the Copy button once the selections have been made.
Click the To all menus button to copy the selection to all target menus.
Account Chart
ATTENTION: To add, modify or remove Accounts parameters, if your restaurant
is interfaced to QuickBooks or any other accounts payable software package,
DO NOT USE the Account Chart option in Accounting Interface / Account.
That legacy feature is only used in restaurant that handle account payable
by printing reports in Maitre'D and inputting numbers manually in a physical
General Ledger, or still manually in another application.
If you ARE interfaced electronically, to keep the integrity of your information,
any changes to your accounts parameters HAVE to be done in QuickBooks,
and only then, be exported to Maitre'D, as explained earlier in this document.
Payable Account Chart (for Payable only)
ATTENTION: The Accounting Interface / Account / Payable Account Chart
option allows ONLY restaurants that are NOT interfaced to QuickBooks or
any other accounts payable software package to add, modify or remove Accounts
payable.
DO NOT USE THIS OPTION, to keep the integrity of your information. Any
changes to your accounts payable have to be done in QuickBooks, and only
then, be exported to Maitre'D as explained in the Accounts Payable documentation.
HOWEVER you do
need to link your Payable to Maitre'D suppliers in the Inventory Management
module, as described in the following section.
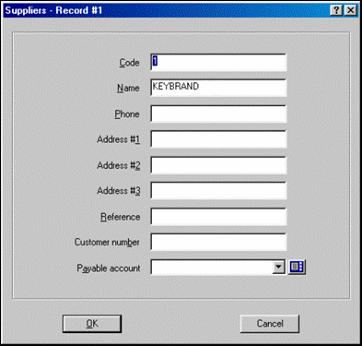
Inventory Management / File / Suppliers
The Suppliers option allows to enter information on all of your suppliers.
You can Add, Modify or Remove supplier Information.
Code:
Enter a code for the supplier.
Name:
Enter the name of your supplier.
Phone:
Enter the phone number of your supplier.
Address #1, Address #2, Address #3:
Enter the complete address of your supplier.
Reference:
Enter the name of the person to contact for purchases.
Customer Number:
You can enter in this field your customer number for this supplier.
Payable Account:
ATTENTION: Select the Account Payable for this supplier.
Server Control / View / Options / Receivable
Here you need to set the Server Control module to know that the Account
Receivable module is managed from Maitre'D.
From Server Control / View / Options, select the Receivable page, the following
screen displays:
Protocol:
Select ACCOUNTING from the drop down menu because you have the Account
Receivable interface from Maitre'D.
Print Balance:
Enable this option to print the actual balance of the customer, this information
will print on the receipt only
P.O.S. Control / Employee / Configuration / Media Type
Receivable:
You have to give access the Receivable media type to each Employee configuration
for every employee allowed to close a guest check as a receivable. This
media type is a reserved media type that you will find as the 49th
record of the media type database. You must use this record for receivable
Accounting Interface / File / Customers
ATTENTION: This function allows ONLY restaurants that are NOT interfaced
to QuickBooks or any other accounts receivable software package to add,
modify or remove customers.
DO NOT USE THIS FUNCTION, to keep the integrity of your information. Any
changes to your customers have to be done in QuickBooks, and only then,
be exported to Maitre'D as explained in the Accounts Receivable documentation.
Note: This function is only available with the Accounts Receivable license.
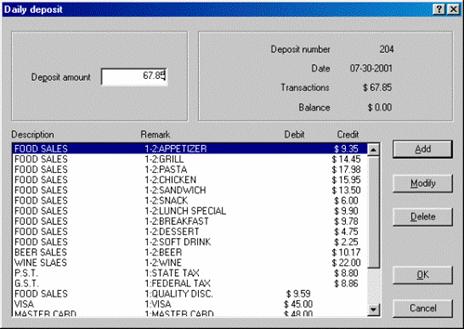
Daily Deposit
Generating the Daily Deposit.
While doing a Daily Deposit, Maitre'D creates a file that can be imported
QuickBooks. It also generates the Daily Deposit Report, displaying in
an accounting format, all P.O.S. divisions, discounts, taxes and media
types. A Daily Deposit must be performed daily. When selecting this option,
Maitre'D shows you the sales information to be deposited the next day
on a Daily Deposit sheet, as shown bellow.
Deposit amount
Enter the Deposit amount. The Transactions field suggests the amount that
was calculated by Maitre'D according to your sales. If the Deposit amount
does not match the Transactions amount, you will need to justify the difference.
Deposit Number
This displays the daily deposit number.
Date
This displays the accounting date for the file created.
Transactions
This displays the amount that the Deposit amount needs to match.
Balance
This displays the difference between the Transaction field and the Deposit
amount field.
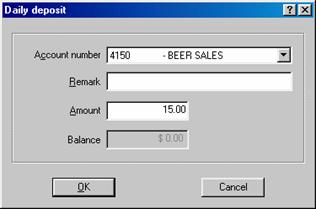
The ADD button allows to add new entries to balance the Transaction and
the Deposit Amount fields. When selecting the ADD button, there is a blank
entry asking to enter the basic information.
Account number
Select from the drop-down menu, the account that you wish for this entry.
Remark
Enter any remark for this transaction.
Amount
Enter the amount for this entry. If this amount affects the Credit column
you must enter a negative amount (ex. $23.35-)
Balance
Displays the current balance according every entry of the Daily deposit.
This field needs to be at $0.00 to be able to close the Daily deposit.
This button allows to modify information on the Daily Deposit entries.
Select the entry that you wish to modify, and click on the MODIFY
button. The Daily Deposit entry will display, allowing changes to any
field of that entry.
This button deletes Daily Deposit entry from the current Daily Deposit
sheet. Select the entry you wish to delete, and click on the DELETE
button.
When the Balance on that sheet equal $0.00, you are able to close the Daily
Deposit by clicking the OK button. An export file is created and
the Maitre'D's Daily Deposit report is generated.
Note: The OK button, that accepts the Daily deposit transaction, is
available only when the Balance field shows zero as a balance.
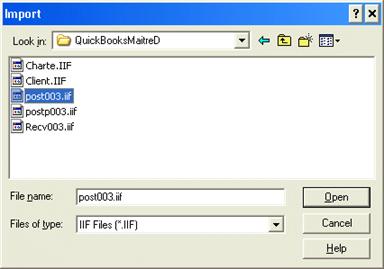
Import General Ledgers Daily Deposit into QuickBooks
Once the Daily Deposit was performed in MaitreD,within QuickBooks, select
the following menus:
File / Utilities / Import
Select the path programmed in Maitre'D's Accounting Interface. The General
ledger Daily Deposit file is named PostDDD.iif, where DDD is the day of
the deposit.
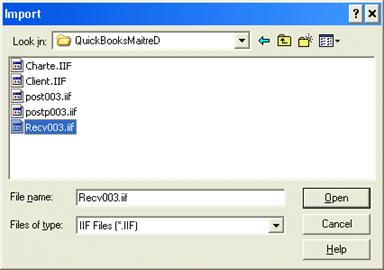
Import Daily Accounts Receivable into QuickBooks (for Receivable only)
Once the Daily Deposit was performed in Maitre'D, within QuickBooks, select
the following menus:
File / Utilities / Import
Select the path programmed in Maitre'D's Accounting Interface.
The Daily Accounts Receivable file is named RecvDDD.iif, where DDD is the
day of the deposit.
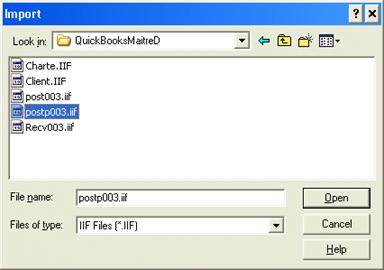
Import Daily Accounts Payable into QuickBooks
(for Payable only)
Once the Daily Deposit was performed in Maitre'D,within QuickBooks, select
the following menus:
File / Utilities / Import
Select the path programmed in Maitre'D's Accounting Interface. The Daily
Accounts Payable file is named PostPddd.iif, where ddd is the day of the
deposit.
Note: QuickBooks Online Edition does not have the ability to import
data.