3 basic steps must be performed at the restaurant in order to install the
GHClient program:
Setup of the Communication Protocol
Setup of the Communication Client Application
Installation of the Communication Client
Setup of the Converter module
Setup of the Communication Protocol
Maitre'D Communication Client
This application is installed in the Back-Office PC at the restaurant's
unit. This application allows the restaurant to call and connect to the
Communication Server to upload its database files and Full System Backup,
as setup in the Converter module of the Back-Office. It also allows the
restaurant to download the Corporate Office's Broadcaster files, as well
as external sales.
As well, it allows the stores to send sales data to the Maitre'D Databoard,
either directly or through the corporate office, where every store sales
and other numbers will be available to a restricted number of password
protected users through a web browser or web capable cell phone. These
numbers can bee looked at in a textual or graphical format, and can also
trigger alerts based on preset thresholds.
* Note: If you want your Backup Server to communicate to the corporate
office when the Main Back-Office PC goes down, the following setup for
the Main Back-Office PC also applies to the Backup Server. Basically,
whatever you do to setup corporate communication on your Main Back-Office
PC should also be done to the Backup Server. This also means that your
Backup Server must have communication access (modem or internet) to the
corporate office as the Main Back-Office PC.
Hardware needed
internal
or external modem set in the Back-Office PC of unit restaurant. We recommend
a with baud rate speed 56 K higher.
Telephone
line available for communication.
The Communication
Client module require the following software for installation
From
Windows 95 and Explorer: Dial Up networking option
From
Maitre'D : Maitre'D Corporate Communication - Client module
Installing Dial Up networking
This document assumes that you already have a modem install that it is
working fine.
For instruction on installing Dial Up Networking, please refer to the appropriate
manuals provided with Windows 95 and Explorer.
When the installation of these modules is completed, a new folder (Dial-Up
Networking) will be added to the My Computer folder.
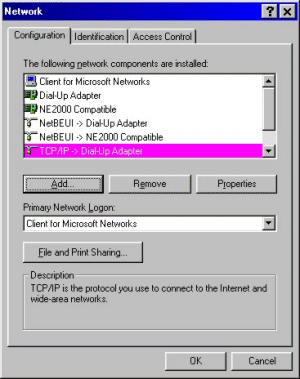
Adding the TCP/IP - Dial UP Adapter
From My Computer / Control Panel / Network,
Select Add / Protocol / Add / Microsoft / TCP / IP
Windows will install the TCP/IP - Dial Up Adapter protocol and will also
install NE2000 - TCP/IP protocol if you have a Network Adapter card installed.
Remove this NE2000 - TCP/IP protocol from the list of network components.
You will need to restart your computer after you make these changes.
Setting the TCP/IP - Dial UP Adapter
From My Computer / Control Panel / Network, highlight the TCP/IP - Dial
UP Adapter and select the Proprieties button:
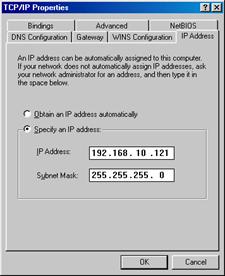
IP Address
Specify an IP Address
IP Address
Enter the IP Address assigned to this computer.
Communication Client running under Windows NT
If this PC is on the Internet (as a server) or will connect to a Windows
NT server, an IP Address and a Subnet Mask will be assigned to it when
it will log to the network. Please refer to the Network Administrator
to know the IP Address. Communication Client running under Windows 95
This PC does not have an assigned IP Address; please refer to the Define
IP Address section later on this document (Annex 2).
Subnet Mask
If from the WINIPCFG program (run WINIPCFG from Start / Run), a Subnet
Mask was assigned to this computer, Enter the Subnet Mask. IF you do not
have a Subnet Mask assigned to this PC enter the following address:
255.255.255.0
IMPORTANT: From My Computer / Control Panel / Network, Make sure to
remove all TCP/IP - network Adapter card (TCP/IP - NE2000) and Dial UP
- NetBEUI protocols.
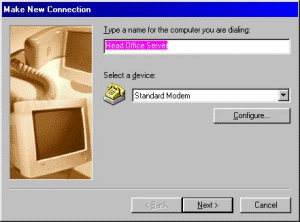
Creating your connection to the corporate office PC
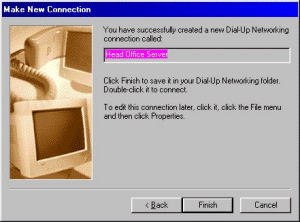
From the My Computer icon at the Desktop, select Dial Up Networking / Make
New Connection. The following screen displays:
Type a name for the computer you are dialing
Enter the description name for this connection such as Corporate Office
server.
Select a device:
Select from this drop-down menu the modem settings that you will use and
click the Next button.
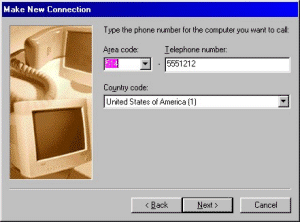
Area code, Telephone number
Enter the area code and telephone number of the Corporate Server PC.
Country code
Select from the drop-down menu your area and click the Next button.
You will need to click the Finish button to accept this new connection
setup. A new shortcut will be displayed in the Dial-Up Networking Folder.
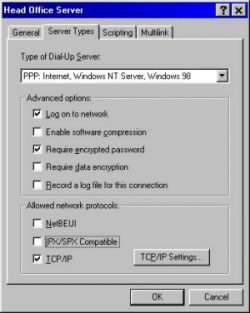
Right click on this shortcut and select proprieties from the menu displays.
Server Types
Type of Dial Up server
Select PPP: Internet, Windows NT Server, Windows 98
Advance Option
Login the network
Enable this option to be able to Login the network.
Enable software compression
Disabled
Require encrypted password
Enabled
Require data encryption
Disabled
Record a log file for this connection
Disabled
Allowed network protocols
Select only TCP/IP protocol
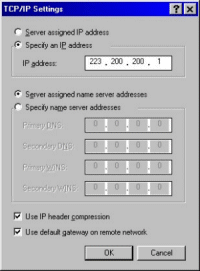
TCP/IP Setting
Specify an IP address
Enabled
IP Address
Enter the IP Address of this computer.
Communication Client running under Windows NT
If this PC is on the Internet (as a server) or will connect to a Windows
NT server, an IP Address and a Subnet Mask will be assign to it when it
will log to the network. Please refer to the Network Administrator to
know the IP Address.
Communication Client running under Windows 95
This PC does not have an assigned IP Address; please refer to the Define
IP Address document.
To access this application, double click on the icon in the task bar.
The following screen displays:
General
Restaurant identifier
Enter here the identifier code for this restaurant.
Incoming path
Enter the path where you want to store the information received from the
Corporate Server application. The default path is C:\POSERA\CCM\INCOMING\CLIENT.
Outgoing path
Enter the path where the information that will be sent the Communication
Server application is stored. The default path is C:\POSERA\CCM\OUTGOING\CLIENT.
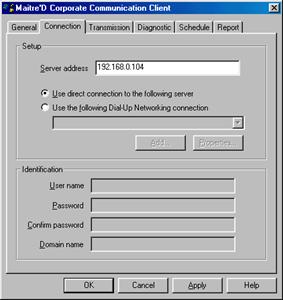
Connection
Please contact your Network Administrator to get the information needed
to fill this page.
Setup
Server address
Enter the IP Address of the Communication server.
Use direct connection to the following server
Enable this option if the Communication Server is accessible without using
a Dial Up connection (internet or intranet connection).
Use the following Dial Up Networking connection
Enable this option if the Communication Server is accessible through a
modem connection.
Identification
User name
Enter the user name used by this unit PC when it is accessing the network.
Password
Enter the password for the user name used by this unit PC when it is assessing
the network.
Confirm password
Enter the password confirmation according with the password field.
Domain name
If this PC will log to a NT Domain, enter the domain name of the network.
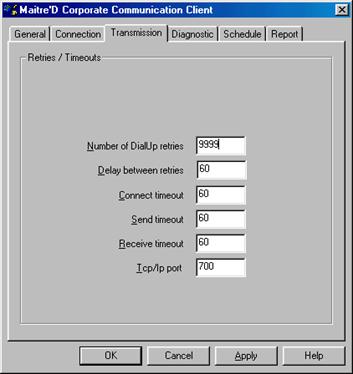
Transmission
Retries / Timeouts
Delay between retries
Enter in seconds the delay between retries
Number of Dial Up retries
Enter the number of time that the Communication Client will try to establish
connection with the Communication Server.
Connect timeout
Enter in seconds the time-out before the Communication Client will disconnect
if it has not been able to synchronize with the Communication server.
Send timeout
Enter in seconds the time-out before the Communication Client will disconnect
if after synchronization, it was not able to transfer data.
Receive timeout
Enter in seconds the time-out before the Communication Client will disconnect
if after synchronization, it was not able to receive data.
TCP/IP Port
See your network administrator if you need to change that option. Note:
TCP/IP port should be the same on the client and server side.
Diagnostic
Log Enable
Select this option to start a log of all connection operations.
View Log
Touch this button to see a log of every connection operation. If you wish
to reset that file, it is usually located in the \POSERA\CCM directory.
The file name is TCPCLOG.TXT. This report is for the system administrator
only.
Disable transmission
Enable this option to disable the transmission with the Communication Server.
Test connection
Click this button to test the connection to the Communication Server. At
the end of the operation, a message screen will display the result of
the test.
Close application
Touch this button to close the Communication Client application. If you
do so, the Communication Client icon will be removed from the taskbar
and the Communication Client application will no longer be active.
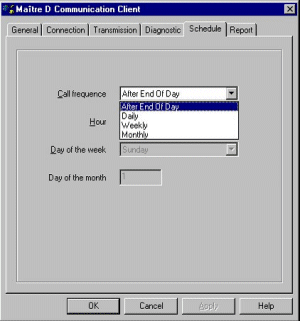
Schedule
Call frequency
Select from the list the frequency you want the Communication Client application
to call the Communication Server and transfer the data files. Following
is a list of the periods that are available.
After End of Day
Daily
Weekly
Monthly
Hour
If you select Daily, enter the time of the day you want the Communication
Client application to call the Communication Server.
Day of the week
If you select Weekly, enter the day of the week you want the Communication
Client application to call the Communication Server.
Day of the month
If you select Monthly, enter the day of the month you want the Communication
Client application to call the Communication Server.
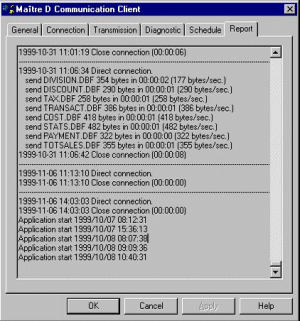
Report
This report will display information on communication and files transfer.
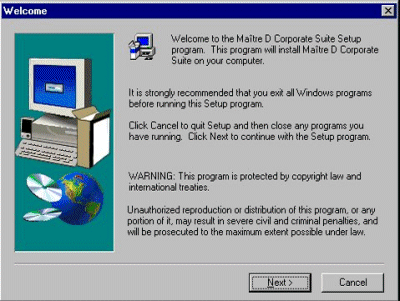
Install the Communication Client
Boot the system on which the Maitre'D Corporate Communication application
needs to be installed.
Once the system has started, insert Disk #1 of the Maitre'D Corporate
Communication software into the 3½ floppy drive of the computer, or insert
your Maitre'D CD-ROM
If you install from 3½ installation disks, from the Start menu,
click on Run.
Type A: SETUP.EXE. The Maitre'D Corporate communication installation
screen appears.
Read the instructions and click on Next. The program displays the
license agreements; click on Yes if you accept to start the installation.
The installation program checks the hard disks installed in the computer
and shows you the destination folder where will be installed the program(s).
You may change this default folder by using the browse button. Then click
Next to go the next step.
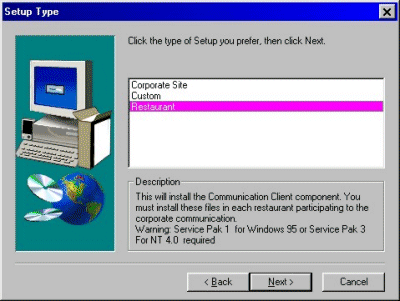
The installation program displays the different Maitre'D Corporate
Communication setup that can be installed on this PC. Select from the
list the Restaurant setup
Custom
Select this setup to customize the installation by specifying manually
the programs that you want to install on this PC. The programs that you
can manually select from this setup are:
Communication Server Report Manager
Database Manager
Communication Client
Corporate Office
Select this setup to install the three Maitre'D Corporate communication
programs that are usually install on the Corporate Office PC.
Communication Server
Report Manager
Database Manager
Restaurant
Select this setup to install the Communication Client application that
needs to be installed on the restaurant PC.
Then click Next to start loading the applications.
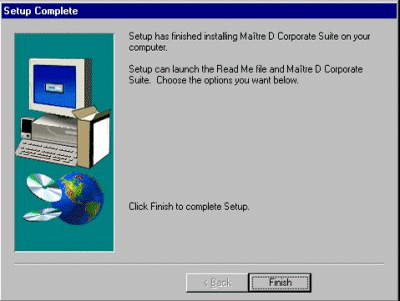
When the installation is completed, the installation program will
display a screen showing that installation was completed successfully.
At this point if you installed the Communication Client or the Communication
Server application, these programs will be included in the Startup Folder
and will be started automatically when you boot your system.
When the Communication Client or Server applications are active,
an icon representing the application will be shown in the task bar near
by the time.
Setup of the Converter module
The Converter Module from the MAITRE'D desktop allows to convert data
file sales, management, payroll and inventory in a Dbase format. These
files can be accessed using any off-the-shelf software such as Crystal
Report or sent remote location Corporate Communication software.<br>
In order to access this module, just click on the Converter icon
From the Back-Office screen or from within the module you are located
if your option Toolbar is selected under your view option.
When selecting the Converter option, the following Converter menu displays:
File / Convert
The convert function from the File menu allows to convert the specified
files of the current day in DBF files manually. The system will create
these DBF files and store them in the directory defined in the View /
Options / General Output Path field.
Toolbar
This option allows to choose whether to display or not to display the toolbar
(all the icons at the top of your screen). This selection toggles from
enable to disable. When there is a check mark beside the option, the option
is enabled and you will see the toolbar.
Status Bar
This option allows to choose whether or not to display the status bar (the
line located at the bottom of your screen). This selection toggles from
enable to disable. When there is a check mark beside the option, the option
is enabled and you will see the status bar.
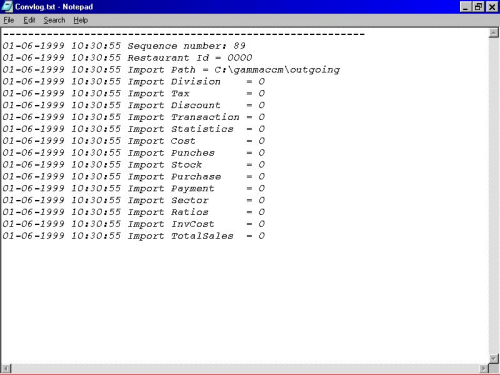
Log File
This option shows you a list of every transaction regarding the conversion
of Maitre'D files in DBF format such as date, time and number of records
exported for each DBF files.
Following is a sample of a log file:
Options
This option allows to set the path where the exported files will be stored.
It also allows to select which DBF files you want to create and will finally
give you access to activate the converter process.
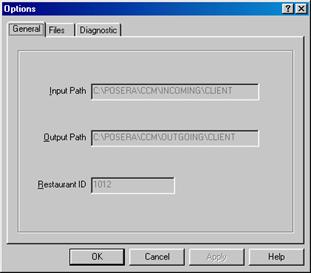
General
Input path
Enter the path where the imported files will be stored. The default is
path is C:\POSERA\CCM\INCOMING\CLIENT
Output Path
Enter the path where the export files will be stored. The default path
is C:\POSERA\CCM\OUTGOING\CLIENT.
Restaurant ID
Enter the Restaurant ID that will be used to identify the files sent to
the Communication Server application. Make sure the Restaurant ID field
is unique for each location.
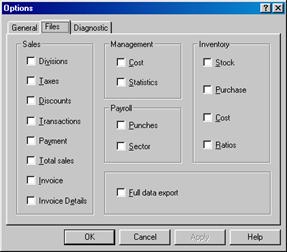
File
Sales
Divisions
Enable this option to export a DBF file that includes the sales amount
by divisions, revenue centers, modes and hours.
Taxes
Enable this option to export a DBF file that includes the taxes by hours
and menus.
Discounts
Enable this option to export a DBF that includes the promotions by hours
and menus.
Transactions
Enable this option to export a DBF file that includes the transaction summary
by hours.
Payment
Enable this option to export a DBF file that includes the detail of sales
payment media.
Totals sales
Enable this option to export a DBF file that includes the permanent totals
recorded by the system.
Invoice
Select the Invoice option to export a DBF file including the summary of
invoices.
Invoice details
Enable this option to export a DBF file including invoice details.
Management
Cost
Enable this option to export a DBF file that includes the sales statistics
and cost by hours.
Statistics
Enable this option to export a DBF file that includes the sales statistics
by hours and menu.
Payroll
Punches
Enable this option to export a DBF file that includes the detail of punches
by employee.
Sector
Enable this option to export a DBF file that includes the total hours and
salary by hours and department.
Inventory
Stock
Enable this option to export a DBF file that includes the stock status
at the beginning of the day (just after End of Day).
Purchase
Enable this option to export a DBF file that includes the detail of inventory
purchases (for new purchases only).
Cost
Ratios
Enable this option to export a DBF file that includes the real and theoretical
cost, inventory value by inventory categories.
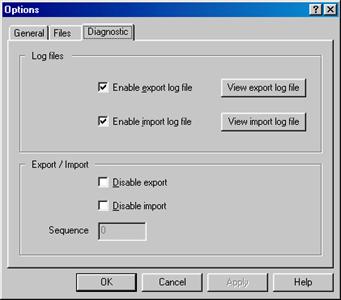
Diagnostic
Log files
Enable export log file
Select this option to start a log of every transaction regarding the conversion
of Maitre'D files in DBF format.
Enable import log file
Select this option to record the events happening during Broadcast file
importation.
Export/Import
Disable export
Select the Disable Export option if you wish to disable the file exportation
of the DBF files. If so, the conversion of the files for the current day
will not be done. After the End of Day process, you will not be able to
go back and export the files for that day.
Disable import
Select the Disable Import option to disable the file importation of the
Corporate Broadcaster menu changes. If so, even if a menu broadcast file
is ready to activate, the menu update will not execute.
Sequence
This field will increment every time the Communication Client application
will send the files to the Communication Server application.