Technical Note: 20080219004
Fastek EFT through FASePay (Canada)
(Maitre'D 7.04.020.008 and later versions of Maitre'D)
Overview
Maitre'D supports the FASePay interface by Fastek for the Canadian market.
This protocol allows Debits and Credit Cards transactions via high-speed
internet. FASePay Back-Office monitors the Maitre'D POS system for new
transaction requests and appropriately processes them with the Moneris
payment host. The FASePay VicDebitPay application provides the functionality
required for Maitre'D POS Terminals to process debit card transactions
through a Moneris gateway.
What is needed
From Posera:
From Fastek:
Fastek: (905) 474-0909
From Moneris:
Merchant number (13 digits)
Credit ECR number (same for the whole system)
E-Select+ Store ID
Token (Generated through the E-Select web site)
Ingenico PIN Pad
Moneris Help Desk: 1- 866-562-4354
Software Requirements
For the Maitre'D Back-Office Server, the following
must be installed:
For each Maitre'D POS Terminal on which VicDebitPay
is to be installed:
FASePay Installation and Configuration
Contact POS Canada for file, passwords and instructions.
Maitre'D Setup
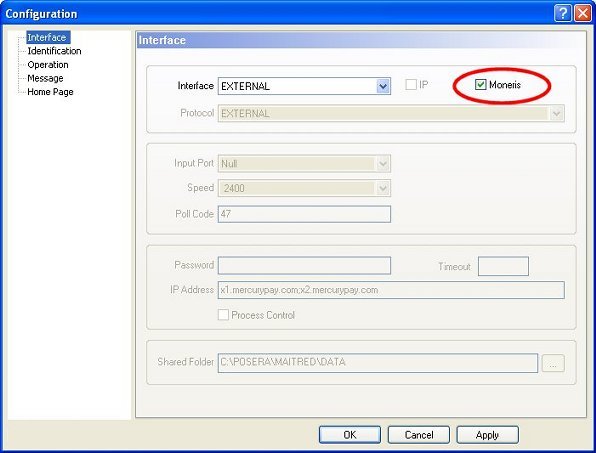
Electronic Funds Transfer / View / Options / Interface
Interface:
External
Moneris:
Enabled
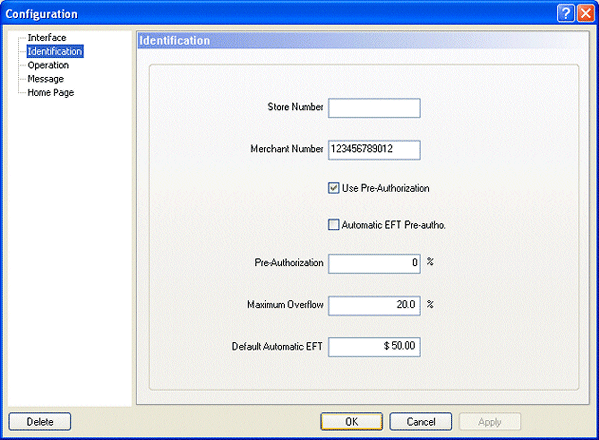
Electronic Funds Transfer / View / Options / Identification
Store Number:
8 digits credit number supplied by Moneris
Merchant Number:
13 digits merchant number supplied by Moneris
Note: The above numbers may be input into the Maitre'D system for informational
purposes only. They are not required for Operations.
Only the FASePay Back-Office needs to have the
Moneris Merchant Information input.
Use Pre-Authorization:
Enabled for restaurants, disabled for retail.
Pre-authorization:
You may do a pre-authorization for an amount greater than the totals of
the check. This percentage may correspond to the tips. For example, if
you want to pre-authorize 15% more on each check, enter 15.0 in this field.
Pre-authorization should never be set over 20%, to avoid surcharges.
Maximum overflow:
Enter the amount of maximum overflow. If a customer enters an amount on
the credit card receipt that is greater than the check total and the pre-authorization
percentage, the maximum overflow is the percentage of the check total
that the customer's payment cannot exceed. If the customer enters a credit
card payment amount that exceeds the maximum overflow percentage, the
system does not accept the payment, and you would have to re-authorize
the transaction, including the tip. Typically you would set this field
to 20%. If this field is set to 0.00%, no verification is made about maximum
overflow and you can enter any amount greater than the check total.
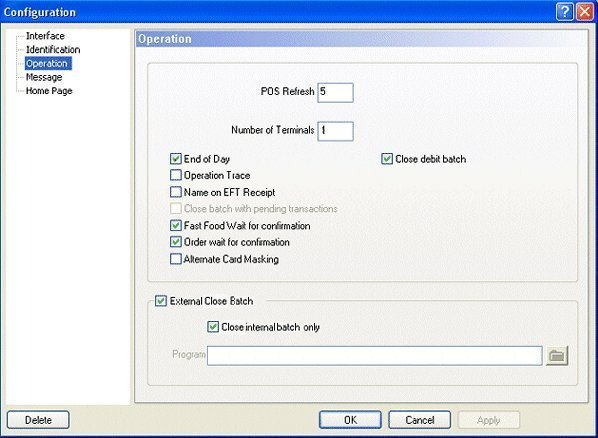
Electronic Funds Transfer / View / Options / Operation
POS Refresh:
Minimum 5.
Close Debit Batch:
Enable this option to close the debit batch when closing the credit
card batch.
External Close Batch:
Enabled
Close Internal Batch Only:
Enabled
Note: When a Batch is closed in Maitre'D, it resets the internal
file ONLY. The actual closing of the batch is done by Moneris automatically
at a preset time each day. See Appendix A for information on how to configure
the desired time for auto batch close on the eSelect Plus website.
Program:
Blank
Note: Remaining information is as per your client's desired configuration
and local authorities.
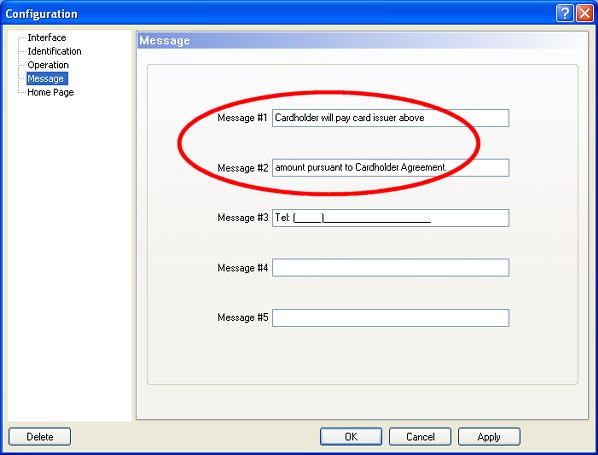
Electronic Funds Transfer / View / Options / Message
Message #1:
Cardholder will pay card issuer above
Message #2:
amount pursuant to Cardholder Agreement.
Note: This is required to be compliant with the Moneris Certification
Requirements.
_SOLUTION_EFT_setup_files/Image17.jpg)
Electronic Funds Transfer / Transaction
All 5 Back-Office transaction types are supported by the External Moneris
interface.
Note: No reports are available in Maitre'D. They are found on the Moneris
E-Select site at www3.moneris.com
Credit Cards
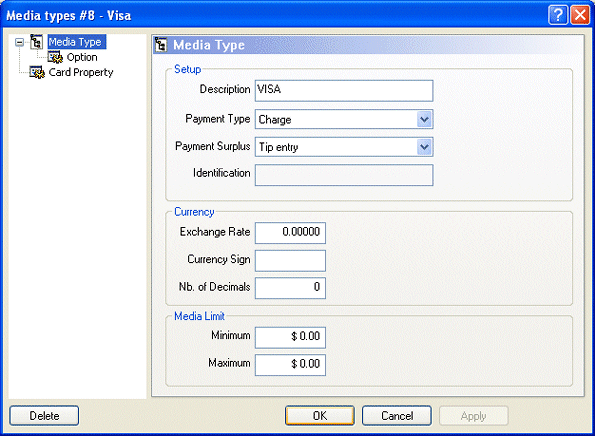
P.O.S. Control / Payments / Media Type
Each credit card media type that is managed by the EFT interface must
be defined.
Payment Type:
Charge
Payment Surplus:
Tip Entry, as credit card companies do not allow cash advances.
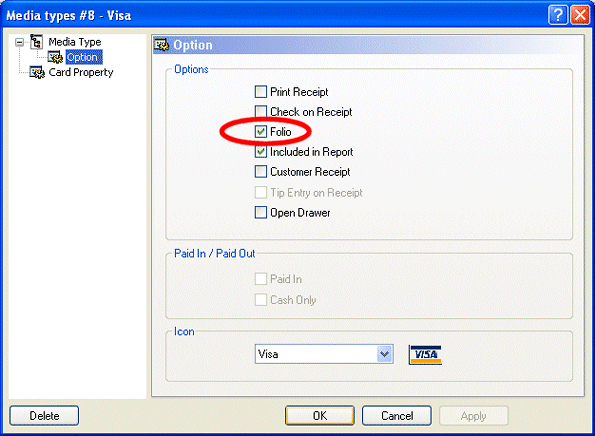
P.O.S. Control / Payments / Media Type / Option
Folio:
Enabled

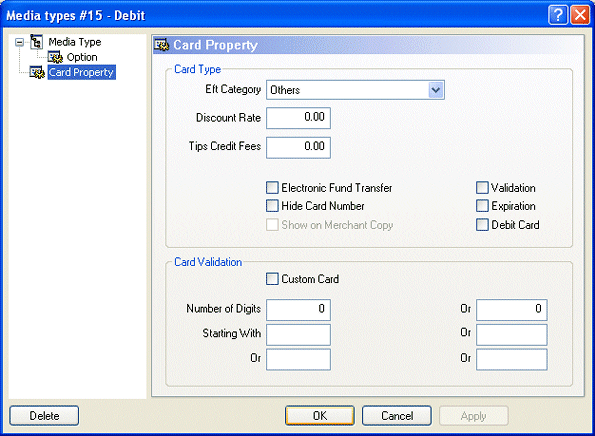
P.O.S. Control / Payments / Card Property
EFT Category:
Select the credit card type.
Electronic Fund Transfer:
Enabled
Hide card number:
This option can not be disabled with CISP compliant protocols. It masks
some digits of the credit card number on the EFT voucher.
Show on Merchant Copy:
This option can not be enabled with CISP compliant protocols.
Validation:
Enabled for most credit card types. This option makes the Back-Office verify
if the credit card number entered agrees with certain digits that are
always present in credit card account numbers. If you disable this option,
the Back-Office does not validate the credit card number. You can override
this option from the workstation by entering a minus sign after the card
number.
Expiration:
Enabled. The expiration date of a credit card has to be entered in the
format MM / YY.
Debit Card:
Disabled
Custom Card:
Disabled
Expiration:
Enabled
Number of digits:
Some credit card companies have credit card numbers that may vary in their
total number of digits. For example, Visa cards may have either 13 or
16-digit numbers, whereas other cards have a set number of digits, for
example, Master Card cards that have 16 digits and American Express cards
that have 15. Two fields should be filled in order to validate the credit
card number's length. Type the credit card's appropriate number of digits
in the first field then type 0 in the second field to specify that this
is a fixed number of digits (zero is the default for the second field).
Conversely, you will need to enter a number of digits in each field for
cards, such as Visa, that have two possible card number lengths. Type
in 0 in both fields for credit card numbers with varying lengths, which
will remove the need to validate the number of digits.
Starting With:
Type in the first digits of the credit card. Some credit card numbers always
begin with the same digits. These digits can be used for validation. For
example: For Visa payment type's "Starting with" field, type
in 4. For Master Card, type in 5, and for American Express, type in 34
or 37. If both fields are blank, the first digit is not selected.
Debit Card
Note: Debit Cards are not supported on CE workstations.
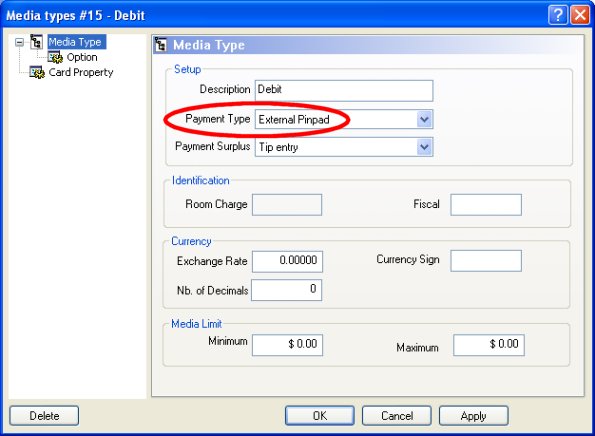
P.O.S. Control / Payments / Media Type
Payment Type:
External PINpad
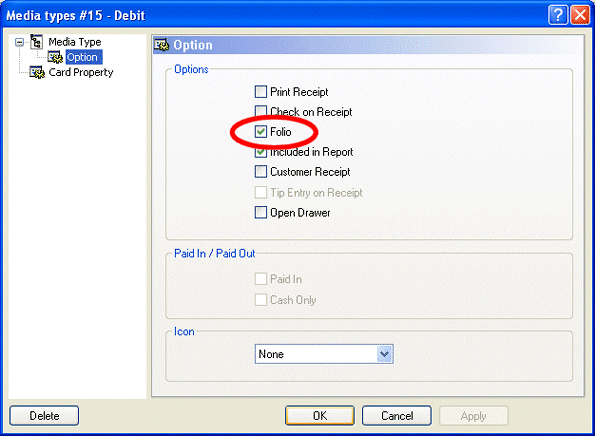
P.O.S. Control / Payments / Media Type / Option
Folio:
Enabled
P.O.S. Control / Payments / Card Property
This page is left blank, with everything disabled.
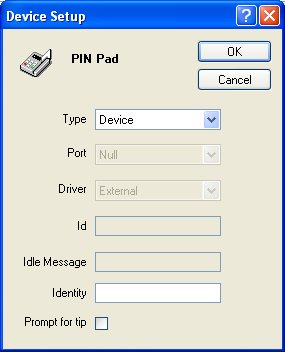
P.O.S. Control / Workstation / Options / Devices / PIN Pad
Type:
Device
Identity:
You could enter the serial port of the PIN pad on the workstation.
Note: This is only for support information. The
system does not use this field.
Prompt For Tip:
Enabled if the restaurant wants to prompt the guest for a tip amount.
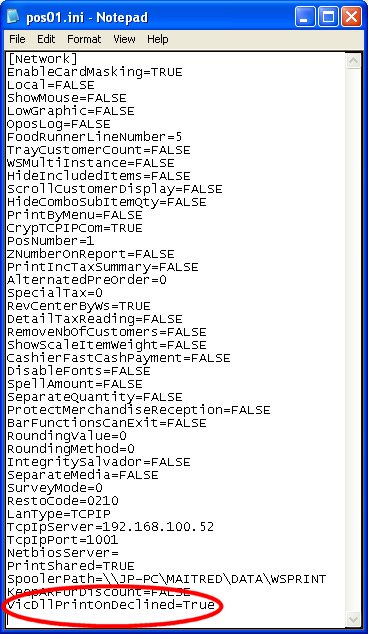
Declined Slip
To print a coupon when a transaction is declined, under the C:\Posera\MaitreD\Data
directory, in the Pos??.ini file (you will need to do it for every Pos
Ex.: Pos01.ini, Pos02.ini), add the following configuration key and value:
VicDllPrintOnDeclined=True
How to process Debit Cards
Ring up a transaction and touch the Close button. When
you reach the Payment screen, touch the Debit Card button, and enter the
full amount (including TIP), or simply touch Enter, and follow the instructions
on the PIN Pad for the rest of the transaction. Once the transaction is
accepted, the workstation will print an approval receipt.
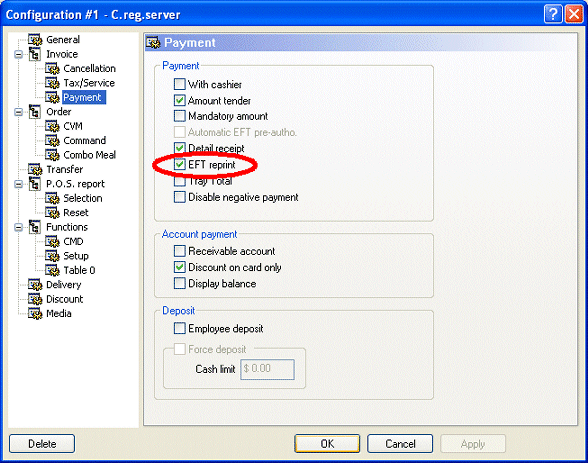
Setting the Employees
P.O.S. Control / Employees / Configuration / Invoice / Payment
EFT Reprint:
Enable this option to allow the employee to print duplicate EFT vouchers.
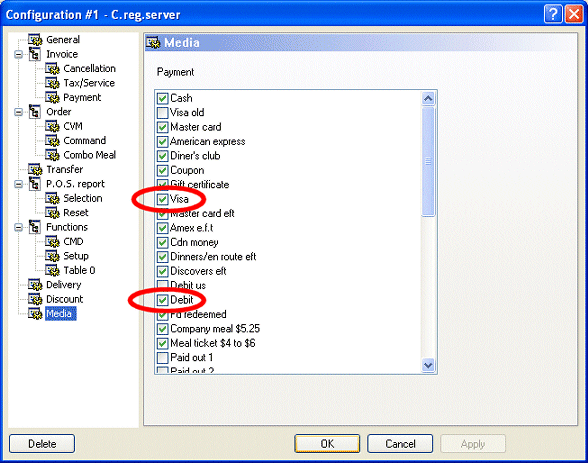
P.O.S. Control / Employees / Configuration / Media
Enable all Credit Cards and the Debit Card payment types.
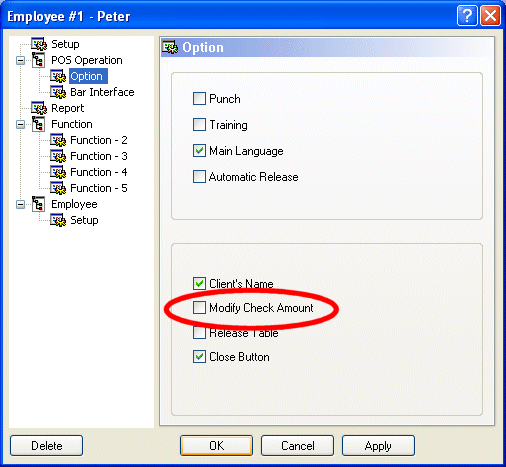
P.O.S. Control / Employees / Employee / POS Operation / Option
Modify Check Amount:
Disabled, as Moneris does not support Tip Adjustment.
Note: Instead, perform a Void CCA Status followed by another pre-authorization.
APPENDIX – A
Obtaining TOKEN from Moneris E-Select plus Web Site
Note: For technical support please contact via e-mail: eselectplus@moneris.com
Browse to https://www3.moneris.com (Note: the https://
prefix must be used)
Select your Language Preference
Click the I want to activate my store. Link (https://www3.moneris.com/mpg/activate/?lang=en)
Enter the 13 Digit Merchant Number provided by Moneris
Enter the E-Select Plus Store ID provided by Moneris
Click [ACTIVATE]
You will be prompted to create an Administrator Username
/ Password
Username: Administrator
Password: xxxxxxxx
Click Save / Submit
After the username is created successfully; the system
will prompt to Login in with your Username / Store ID / Password
You will be prompted to change your password
After completing the process click on the ADMIN Link
at the top of the page
Now Click the STORE SETTINGS Link at the top of the
page
You will now see your TOKEN (e.g: Ou4OmXIULFravCkdIvqR)
Copy and paste this into the FASePay Back-Office options
/ Host Page
Setting Auto Batch Close times on E-Select plus Web Site:
After completing above steps; remain in the STORE SETTINGS
page under the ADMIN Section and scroll down.
You will see an Auto Batch Close Section with 3 Options.
Select the 3rd option to Automatically Close the batch
at the pre-determined time, and set the time to 04:00 hrs