Network
card (address 0210 - 021F and interrupt 5)
On board
touchscreen driver using com4 int 10
Built
in printer using com3 int 11
32 MB
RAM
Hardware needed for a stand alone EPSON.
One (1)
PS / 2 Keyboard (you can also use a PS / 2 Keyboard)
Additional
hardware components available from EPSON
Magnetic
card reader
Customer
pole display
Cash
drawer (maximum 2)
In addition
to these hardware components, Windows 95 / 98 Operating System needs to
be installed.
Installing Windows 95 Operating System.
If this hard drive does not come with an operating system, you will have
to boot with a system disk and then install Windows 95 / 98 from diskettes.
For instructions on installing Windows 95 / 98, please refer to the appropriate
manuals provided with Windows 95 / 98.
Please note that during the installation of Windows 95 / 98, At the
Analyzing Your Computer Step, you will be prompt to click on different
component that your system may have. Do not select any of these three
components:
CD-ROM
Drive
Network
Adapter
Sound,
Midi, or Video Capture Card
Installing Windows Touchscreen drivers
Insert the touch screen driver floppy in drive A:
Run a:\t5setup.exe
Select the target directory (default windows)
Select screen type: AHL / AR5000 and Digitouch Controllers
Enter group name (e,g, Touch)
On the next screen, ignore the switch setting and select OK
Hardware Control (serial) screen:
Com4, address 02E8, IRQ 10, 600 baud, parity none, data bits 8, stop
bits 1 readme file: OK
Installation complete, reboot
After the system boots, the touch screen will beep but not necessarily
work very well. It needs to be calibrated.
From the Start menu, select programs, touch (or whatever group
name you used above in step 5), touchscreen control.
Then run the calibrate utility.
Install 3Com drivers
Insert 3Com driver disk 1 in floppy drive
from My Computer, Control Panel, Network Select Add / Adapter Have
Disk
Type
A:\ and click on OK to continue.
Model:
select 3Com Etherlink III ISA (3C509 / 3C509b) in ISA mode and click OK
to continue.
Windows
will automatically add other network component. Click on the component
3Com Etherlink III ISA (3C509 / 3C509b) in ISA mode and click on PROPERTIES.
Click
on the RESOURCES tab and enter the following information:
Select I / O Address 0210-021F for the 3Com network card and click
OK to continue.
Click
on the IDENTIFICATION tab and enter the following information:
Computer Name: MAITRE D (upper case)
Workgroup: PSI (upper case)
The 3Com Wizard program
will then display.
IMPORTANT: Follow next steps carefully to set the card.
Select custom Installation.
Check
from the network parameter windows the current setting of the card. These
should be:
I / O Base Address__________0x210
Interrupt Request Level______5
NIC Test: DO NOT PERFORM NIC TEST.
Network Connection Test: DO NOT PERFORM NETWORK CONNECTION TEST.
Do you want to install and configure TCP / IP. Select NO.
Make sure that you see:
Computer
Name: MAITRE D (upper case)
Workgroup:
PSI (upper case)
DynamicAccess software, select Next without changing anything here.
Repeat Last installation, select No.
Installation Complete, select Finish to end
the 3com installation
Windows® might prompt to enter a specific Windows® installation disk.
Insert the required disk and click OK to continue. Windows will install
network drivers and will ask to reboot the computer. Select Yes to reboot
the computer now.
When Windows® will restart, it will ask to enter a user name. Enter
MAITRE D (upper case), do not enter any password and click on OK to access
Windows® network.
Setting Windows 95 / 98 for the EPSON IM-300 and the Maitre'D software
Before you try to start the local workstation or connect any workstation
on the network, you will need to make the following changes in your Windows
95 / 98® of the EPSON IM-300.
Network components
My Computer, Control Panel, Network
Remove Client for NetWare Networks
Remove IPX / SPX-compatible protocol
Remove TCP / IP
Select from Primary Network Login list: Windows Login
Select File and Print Sharing button and turn on the following:
I want to be able to give others access to my files
I want to be able to allow others to print to my printer(s)
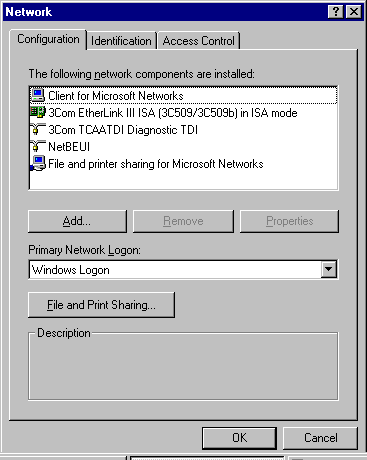
When finish in the network components list, you need to have the following:
Client For Microsoft Network
3com Etherlink III ISA (3C509 / 509b) in ISA mode
3Com TCAATDI Diagnostic TDI
NetBEUI
File and printer sharing for Microsoft Networks
Note :Be sure to remove the " IPX / SPX - Compatible protocol
"
Click OK to accept these parameters, Windows will ask to reboot the computer.
Select Yes to reboot now.
Share C drive
In My Computer, you will need to share your C: drive. To do so, "
right click " on the icon representing your C drive. Click on SHARING
and choose " SHARE AS ". The Share Name must be GDATA (uppercase).
Access type must be FULL.
My Computer, Control Panel, Display, Setting TAB
Select High Color (16 bit)
Installing Maitre D 2000 from the network
To install the Maitre D software from the network, you must have a network
connection between the EPSON IM-300 and a Windows 95 / 98 PC with a CD-ROM
drive. This drive must be shared. You can connect to the network from
cross-connect cable or from a hub using standard network cables.
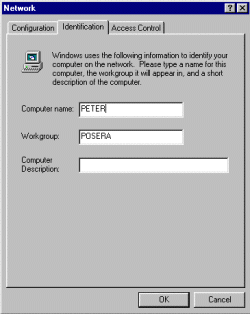
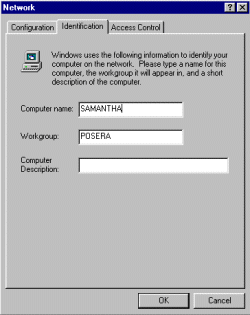
1. From the network component screen / Identification page, have different
computer names but use the same Workgroup such as POSERA.
EPSON IM-300;
PC with shared CD-ROM Reboot each computer. When both PC will be back on,
insert Maitre'D 2000 Disk in PC CR-Rom drive. Start the Installation program
4.1 From the EPSON IM-300, click on network neighborhood
4.2 Select on the other PC icon.
4.3 Select the Shared CD-ROM Drive
4.4 Select the BO folder
4.5 Select DISK1 folder
4.6 Select setup.exe and follow instructions
Using Built in Magnetic Card Reader
Built in card reader is keyboard wedge. No additional setup is required.
Using Built in Customer Display
Pole display use the same COM port as the built in printer
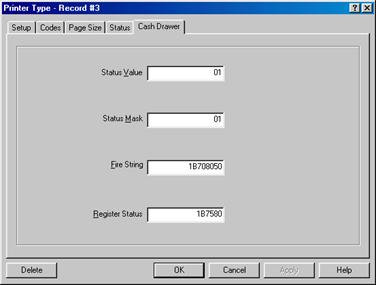
Using the Built in Printer
IM-300 built in printer use TM-T88 setup codes as follow:
IMPORTANT :If you are not using a pole display, you must use a loop-back
connector to jump pin 4 (DSR) and pin 5 (DTR) on DMD connector to have
your printer work properly.
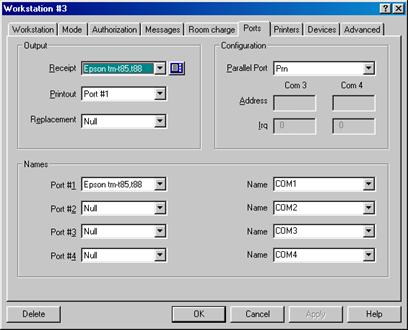
This device use com3 int. 10. In the workstation Port Configuration page,
set the receipt as the following screen: