When you get the answer, enter the code in the ENTER
CODE box in setup / setup information.
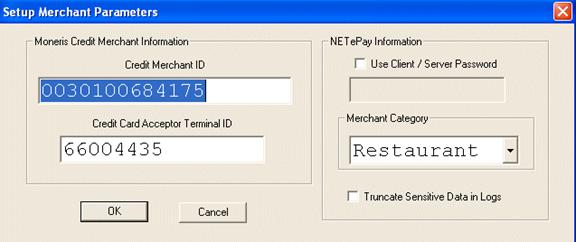
Merchant Category:
Restaurant
Note: The remaining information will be supplied by the merchant services
provider.
DSIClientX Control Installation:
The DSIClientX control is not included in Maitre'D installation. This
application is an XML ActiveX client controlled software that sends encrypted
payment authorization requests via a local area network or Internet to
Datacap's dial and Internet payment servers.
The DSIClientX control must be installed on your Maitre'D Back-Office
PC and on every workstations that
will process Debit Cards with a PIN Pad. The control is available as a
free 5mb self installing executable from
http://www.datacapepay.com/
It may be installed before or after Maitre'D and takes just a minute to
install (requires a reboot).
DO NOT TRY TO SKIP THIS STEP !!!!!
Maitre'D Configuration
Electronic Funds Transfer / View / Options / Interface
Interface:
Datacap - DSIClientX
Protocol:
Generic (USA and Canada)
IP Address:
Address of the computer where the NETePay for Moneris is installed.
Note: Do not use the 127.0.0.1 local host loop back address, even if
on same computer as Maitre'D. Use the exact address, such as 192.168.100.1
Moneris:
Enable this payment channel.
Note: In Maitre'D 2003, to enable this payment channel, under the C:\Posera\MaitreD\Data
directory, in the [Miscellaneous] section of the Bo.ini file, add the
following configuration key and value:
MonerisEFT=True
Note: The "M" has to be uppercase
Electronic Funds Transfer / View / Options / Identification
Store Number:
8 digits credit number supplied by Moneris
Merchant Number:
13 digits merchant number supplied by Moneris
Electronic Funds Transfer / View / Options / Operation
POS Refresh:
5 or higher
Name on EFT Receipt:
Disabled
External Close Batch:
Enabled
Close Internal Batch Only:
Enabled
Note: When a Batch is closed in Maitre'D, it resets the internal file
ONLY. The actual batch closing is performed by Moneris automatically at
a preset time each day. Synchronize with your Moneris representative for
the time of the batch closing.
Program:
Blank
Note: Remaining information is as per your client's desired configuration
and local authorities.
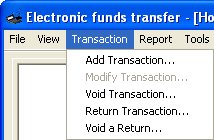
Electronic Funds Transfer / Transaction
The Modify Transaction function is disabled, as the Datacap - DSIClientX
Moneris interface does dot support this operation.
Note: No reports are available in Maitre'D. They are found on the Moneris
site, and in the NETePay administrator program.
Credit Card
P.O.S. Control / Payments / Media Type
Description:
Type in a description for this type of credit card. This description
is displayed on the workstations when employees select this media type
and printed on readings.
Payment Type:
Charge
Payment surplus:
Tip Entry, as credit card companies do not allow cash advances.
Note: Remaining information is as per customer's preferences.
P.O.S. Control / Payments / Media Type / Option
Folio:
Enabled
Note: In Maitre'D 2003, this option is on the above branch P.O.S. Control
/ Payments / Media Type
Note: Remaining information is as per your client's desired configuration
and local authorities.
P.O.S. Control / Payments / Media Type / Card Property
EFT category:
Select the payment category code to use with EFT. (Visa, Master Card, Amex
or Others)
Electronic Fund Transfer:
Enabled
Hide card number:
This option can not be disabled with CISP compliant protocols. It masks
some digits of the credit card number on the EFT voucher.
Validation:
If you enable this option, the Back-Office verifies if the credit card
number entered agrees with certain digits that are always present in credit
card account numbers. If you disable this option, the Back-Office does
not validate the credit card number. You can override this option from
the workstation by entering a minus sign after the card number.
Expiration:
Enabled. The expiration date of a credit card has to be entered in the
format MM / YY.
Debit card:
Disabled
Number of digits:
Some credit card companies have credit card numbers that may vary in
their total number of digits. For example, Visa cards may have either
13 or 16-digit numbers, whereas other cards have a set number of digits,
for example, Master Card cards that have 16 digits and American Express
cards that have 15. Two fields should be filled in order to validate the
credit card number's length. Type the credit card's appropriate number
of digits in the first field then type 0 in the second field to specify
that this is a fixed number of digits (zero is the default for the second
field). Conversely, you will need to enter a number of digits in each
field for cards, such as Visa, that have two possible card number lengths.
Type in 0 in both fields for credit card numbers with varying lengths,
which will remove the need to validate the number of digits.
Starting With:
Type in the first digits of the credit card. Some credit card numbers
always begin with the same digits. These digits can be used for validation.
For example: For Visa payment type's "Starting with" field,
type in 4. For Master Card, type in 5, and for American Express, type
in 34 or 37. If both fields are blank, the first digit is not selected.
Note: Remaining information is as per customer's preferences.
Debit Card
P.O.S. Control / Payments / Media Type
Description:
Type in a description for the debit card. This description is displayed
on the workstations when employees select this media type and printed
on readings.
Payment Type:
Canadian Debit
Note: Remaining information is as per your client's desired configuration
and local authorities.
P.O.S. Control / Payments / Media Type / Option
Folio:
Enabled
Note: In Maitre'D 2003, this option is on the above branch P.O.S. Control
/ Payments / Media Type
Note: Remaining information is as per your client's desired configuration
and local authorities.
P.O.S. Control / Payments / Media / Type Card Property
This page is left blank, with everything disabled.
P.O.S. Control / Workstation / Options / Devices / PIN Pad
Type:
Serial
Port:
Port number where the PIN Pad is plugged in
Driver:
Canadian Debit
ID:
Debit number associated with the appropriate PIN Pad as received from
Moneris
Prompt For Tip:
Enabled if the restaurant wants to prompt the guest for a tip amount.
Identity:
Moneris2
Note: In Maitre'D 2003, to specify the PIN Pad type for DSIClientX
transactions, under the C:\Posera\MaitreD\Data directory, in the Pos??.ini
file (you will need to do it for every POS Ex.: Pos01.ini, Pos02.ini),
add the following configuration key and value:
PadType=Moneris2
Note: The "M" has to be uppercase. After modifying the INI
file, redo workstation data.
How to process Debit Cards
Ring up a transaction and touch the Close button. When
you reach the Payment screen, touch the Debit Card button, and enter the
full amount, or simply touch Enter, and follow the instructions on the
PIN Pad for the rest of the transaction. Once the transaction is accepted,
the workstation will print an approval receipt.
Setting the Employees
P.O.S. Control / Employees / Configuration / Invoice / Payment
EFT reprint:
Enable this option to allow the employee to print duplicate EFT vouchers
before the transaction is finalised.
P.O.S. Control / Employees / Configuration / Media
Enable all Credit Cards and the Debit Card payment types.