(Maitre'D 2003, from Service Pack 11 and later versions of 2003)
(Maitre'D 2005, from Service Pack 3 and later versions of 2005)
Maitre'D can connect to the NCR server using the 3201 protocol with
a TCP/IP connection through a Virtual Private Network (VPN) tunnel. The
VPN tunnel ensures that the data transmitted is secure.
Note: NCR requires to establish the VPN tunnel with the Netgear FVS318
VPN Firewall client device. This router is the only device approved by
NCR for this setup.
Required software and Hardware:
Form Posera:
Electronic Funds Transfer interface.
From your Internet provider:
High Speed Internet connection.
From NCR:
NETGEAR FVS318 VPN Firewall is the device selected by NCR. The system will
connect to the NCR server using a TCP/IP connection and a VPN tunnel.
The VPN tunnel will ensure that the data transmitted will be secure. To
establish this kind of VPN tunnel we will require the use of a VPN client
device.
Note: It is very important to fill out every information applicable
on all pages, to avoid delaying the setup because of back and forth email.
NCR Terminal ID:
This is the number starting with 4600 if this merchant already processed
credit cards through NCR.
Number of Devices Accessing the VPN Tunnel:
This number represents the Main Maitre'D back-Office Server plus any
Emergency Backup. The number of Points Of Sales is irrelevant.
NCR Customer Number:
4660
Category Code:
5812 for restaurants.
Before trying to establish the VPN connection:
When you receive the VPN device, you will need to configure a few fields,
but most will have been preset by NCR. Place the device between the Internet
and the server. Ideally, all devices attached to NETGEAR should be set
to use DNS to retrieve their IP Address. You will need to configure the
NETGEAR so it will access the internet. The following is an example of
the NETGEAR software setup. This will be different for each user.
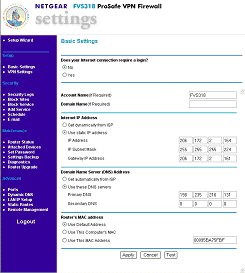
NETGEAR Basic Settings
Does your internet connection require a Login?
NO
Account name:
FVS318
Internet IP address:
Get dynamically from ISP should be enabled unless customer has a static
address from his provider. In this case, customer must enter IP
address, IP subnet mask and Gateway IP address.
Domain Name Server (DNS) Address:
Get automatically from ISP should be enabled unless customer has a static
address from his provider. In this case, customer must enter Primary
DNS and
secondary DNS.
Router's MAC address:
Use default address is enabled.
Configuration of the VPN:
Once NETGEAR is connected to the internet and you can browse the web, you
will need to configure the VPN. To do this you need the connection information
from NCR. Check these screens for the VPN configuration entries.
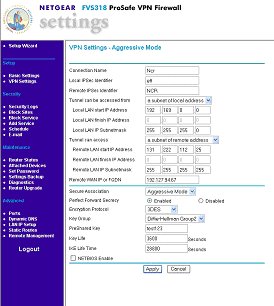
VPN Settings
Connection Name:
NCR EFT Connect
Local IP Sec Identifier:
Restaurant number preceded by the # sign (will be provided by NCR).
Remote IP Sec Identifier:
NCR (needs to be this)
Tunnel can be accessed from:
A subnet of local addresses
Local LAN start IP address:
Provided by NCR
Local LAN IP subnet mask:
Provided by NCR
Tunnel can access:
A subnet of remote address
Remote IP address:
131.222.112.25
Remote IP subnet:
255.255.255.255
Remote WAN IP address:
192.127.94.73
Secure Association:
Aggressive mode
Perfect Forward Secrecy:
Enabled
Key Group:
Diffie-Hellman Group2
Preshared key:
Delivered by telephone to the Distributor contact only.
Keylife:
3600 seconds
IKE Life time:
28800 seconds
NETBIOS enable:
NO
LAN IP Settings
Enable UPnP:
NO
LAN IP Settings / LAN TCP/IP Setup
IP address:
within the range as received from NCR for the local LAN start IP address
IP subnet mask:
as received from NCR for the local LAN IP subnet mask
RIP direction:
NONE
RIP version:
RIP-2B
LAN IP Settings
MTU Size:
Default is enabled
Use router as DHCP server:
Customer's choice
Maitre'D Setup
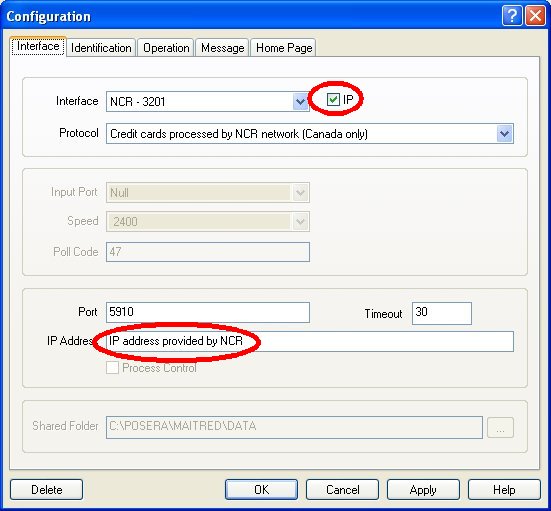
Electronic Funds Transfer / View / Option / Interface
The Electronic Fund Transfer (EFT) module must be installed on the Maitre'D
license. The following describes all required and optional fields used
for this setup. Select EFT on the Maitre'D Back-Office.
Interface:
NCR - 3201
IP:
Enabled
Protocol:
Credit cards processed by NCR network (Canada only)
Port:
NCR will provide the IP Port for to connect to their system.
Timeout:
The systems will time out if there is no connection established to NCR.
The value is usually set to 30.
IP Address:
NCR will provide the IP address for to connect to their system.
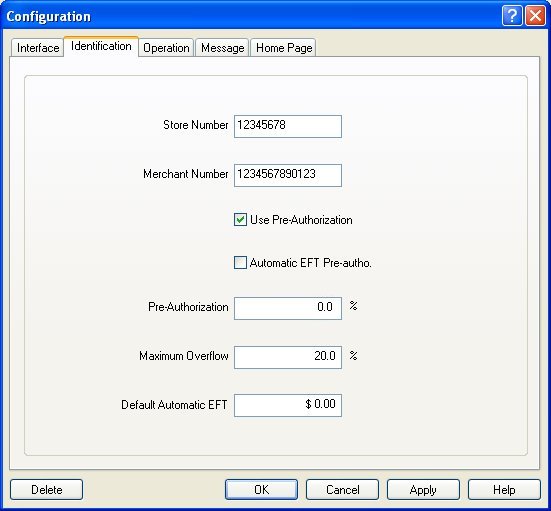
Electronic Funds Transfer / View / Option / Identification
Store Number:
Provided by NCR clearing house.
Merchant number:
Provided by Moneris (Royal bank)
Note: This field is only used for Debit Cards.
Use Pre-authorization:
If you enable this option, the Back-Office will make a pre-authorization
on the credit card. (Disable this option if you are a Fast-Food restaurant)
Pre-authorization:
You may do a pre-authorization for an amount greater than the totals of
the check. This percentage may correspond to the tips. For example, if
you want to pre-authorize 15% more on each check, enter 15.0 in this field.
Pre-authorization should never be set over 20%, to avoid surcharges.
Maximum overflow:
Enter the amount of maximum overflow. If a customer enters an amount on
the credit card receipt that is greater than the check total and the pre-authorization
percentage, the maximum overflow is the percentage of the check total
that the customer's payment cannot exceed. If the customer enters a credit
card payment amount that exceeds the maximum overflow percentage, the
system does not accept the payment, and you would have to re-authorize
the transaction, including the tip. Typically you would set this field
to 20%. If this field is set to 0.00%, no verification is made about maximum
overflow and you can enter any amount greater than the check total.
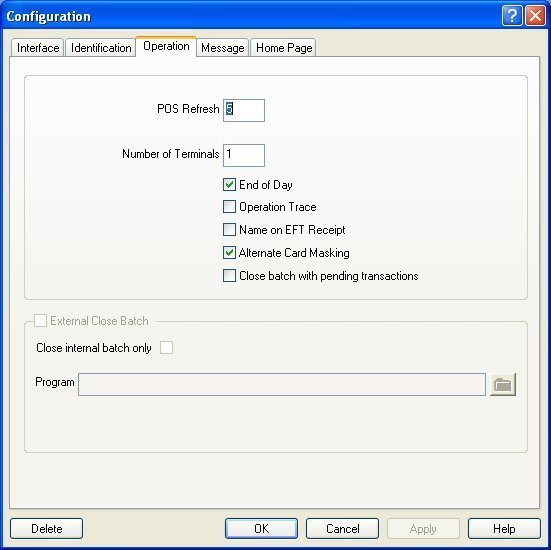
Electronic Funds Transfer / View / Option / Operation
POS refresh:
In EFT IP processing the value should be 5 seconds or more. This is the
number of seconds the workstation will wait before making the first inquiry
to the Back-Office to find out if a request was answered.
End of day:
If you enable this option, the End of Day will be permitted even if the
credit cards batch is still open. Otherwise, you will need to close the
open batch before you run the End of Day process.
Alternate Card Masking:
Enable this option to mask the last 4 digits of the credit card number
and only shows the first 10 digits on EFT vouchers.
Note: Remaining information is as per your client's desired
configuration and local authorities.
PIN Pad for Debit Card
Ingenico 3070 PIN Pad
Available options at the workstation
Regular transaction; add tips, then finalize Modify the tip amount (for
credit cards only).
Available options at the Back-Office PC
Close batch Report Refund Void transaction Add transaction
P.O.S. Control / Payment / Media type
Each credit card media type that is managed by the EFT interface must
be defined.
Description:
Type in a description for this type of credit card. The Back-Office prints
this description on reports and readings, and the description displayed
on the workstations when employees select a media type.
Payment type:
Charge.
Payment surplus:
Tip Entry, as credit card companies do not allow cash advances.
Folio:
Enabled.
Included in Report:
If you enable this option, the transactions closed with this payment type
will be included in the Credit Card report. Otherwise, they will only
be included in the Summary of Payments report.
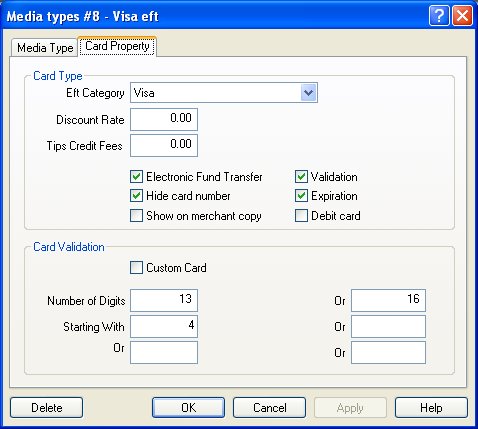
P.O.S. Control / Payment / Card Property
EFT category:
Select the payment category code to use with EFT.
Electronic Fund Transfer:
Enabled.
Hide card number:
This option can not be disabled with CISP compliant protocols. It masks
some digits of the credit card number on the EFT voucher.
Validation:
If you enable this option, the Back-Office verifies if the credit card
number entered agrees with certain digits that are always present in credit
card account numbers. If you disable this option, the Back-Office does
not validate the credit card number. You can override this option from
the workstation by entering a minus sign after the card number.
Expiration:
Enabled. The expiration date of a credit card has to be entered in the
format MM / YY.
Number of digits:
Some credit card companies have credit card numbers that may vary in their
total number of digits. For example, Visa cards may have either 13 or
16-digit numbers, whereas other cards have a set number of digits, for
example, Master Card cards that have 16 digits and American Express cards
that have 15. Two fields should be filled in order to validate the credit
card number's length. Type the credit card's appropriate number of digits
in the first field then type 0 in the second field to specify that this
is a fixed number of digits (zero is the default for the second field).
Conversely, you will need to enter a number of digits in each field for
cards, such as Visa, that have two possible card number lengths. Type
in 0 in both fields for credit card numbers with varying lengths, which
will remove the need to validate the number of digits.
Starting With:
Type in the first digits of the credit card. Some credit card numbers always
begin with the same digits. These digits can be used for validation. For
example: For Visa payment type's "Starting with" field, type
in 4. For Master Card, type in 5, and for American Express, type in 34
or 37. If both fields are blank, the first digit is not selected.
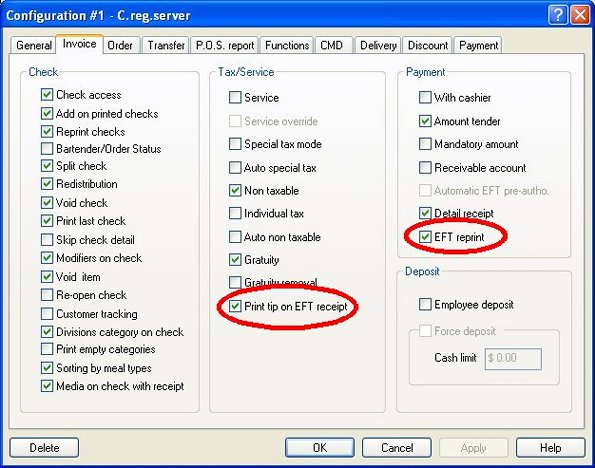
P.O.S. Control / Employees / Configuration / Invoice
EFT options must be assigned to the employee configurations.
Print tip on EFT receipt:
Enable this option to print the tip and total lines on the EFT credit card
voucher.
EFT reprint:
Enable this option to allow the employee to print duplicate EFT vouchers.
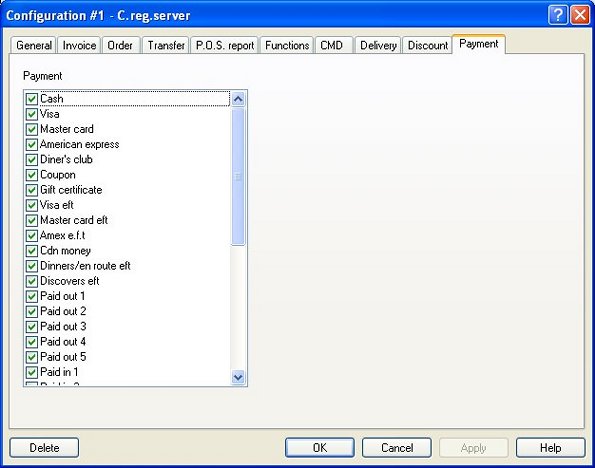
P.O.S. Control / Employees / Configuration / Payment
Payment
Enable all EFT media type that this employee configuration is allowed to
select on the POS.
In case of problems
These steps have to be performed before contacting the HELP DESK of
NCR in Toronto
Verify the VPN router programming
Reboot the rooter
Verify the ISP connection
Determine the status of VPN connection to NCR (active
or inactive)
Be prepared to send screen captures of the VPN router
programming
NCR HELP DESK in Toronto: 1-800-263-4308
Note: The merchant is not to call the help desk himself.
The dealer has to be contacted to perform the first tests,
and the only the dealer can call the help desk.
Common Problem:
VPN connection is inactive.
Solution:
PING or TELNET from the Main Maitre'D Back-Office Server as this is
the PC with the right address for the VPN.