![]()
![]()
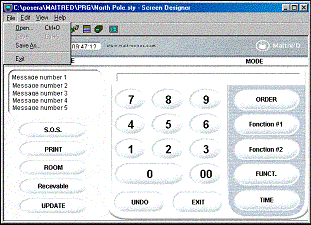
The POS Screen Designer lets you create, modify Windows POS screen styles. These styles are available in the Workstation setup screen.
To access POS screen Designer, from Windows Start menu, select Program and Maitre'D Back-Office group, select POS Screen Designer.
The following screen displays.

The Open function from the File menu allows to open Workstation Screen styles in many different locations from the Open dialog box. You can open a Workstation style on your computer hard disk or on a network drive that you have a connection to. Default location for your screen styles is under the Main Back-Office directory.
Save and Save As&ldots; options from the File menu allows to save the active Workstation screen style you are working on. You can save a copy of the active style with a different name or in a different location. Default location for your screen styles is under the Main Back-Office directory. File extension must be defined as STY.
To manage any following option from the Edit menu, A POS Style screen must be opened.

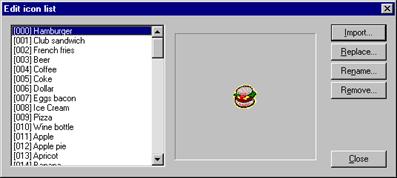
The icon list option from the Edit menu allows to manage the icons database available for the setting of preferential and payment screens. This icon list will be available either from the Back-Office Preferential screen setup option or the Windows POS screen setup tool.
![]()
Use this button to replace an existing icon from the list with another
one. Highlight the icon that you want to replace and select REPLACE button.
![]()
Use this button to rename an existing icon from the list or to add a name
to a new icon imported to the list. Highlight the icon you want to change
the description and select the RENAME button.
![]()
Use this button to remove an existing icon from the list. Highlight the
icon that you want to remove from the list and select the REMOVE button.
The Bitmap list option from the Edit menu allows you to replace the button, panel and logo bitmaps that are use in the current Screen style. These bitmaps affect the graphic layout of the entire Screen style.
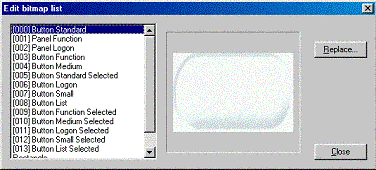
From the bitmap list:
Button Standard option stores current graphic layout of function button like the 0 used by this Screen style. You can change button's graphic using the REPLACE button. The new graphic must be a bitmap (BMP) file.
Panel Function option stores current background screen used by this screen style. You can change panel's graphic using the REPLACE button. The new graphic must be a bitmap (BMP) file.
Panel Login option stores current logo of the Login screen used by this screen style. You can change logo's graphic using the REPLACE button. The new graphic must be a bitmap (BMP) file.
Button Function option stores graphic layout of function button like order used by this screen style. You can change logo's graphic using the REPLACE button. The new graphic must be a bitmap (BMP) file.
Button Medium option stores button like button 1-9 used by this screen style. You can change logo's graphic using the REPLACE button. The new graphic must be a bitmap (BMP) file.
Button Standard select option stores current standard button selection background used by this screen style. You can change logo's graphic using the REPLACE button. The new graphic must be a bitmap (BMP) file.
Button Login option stores graphic layout of button like "update" used by this screen style. You can change logo's graphic using the REPLACE button. The new graphic must be a bitmap (BMP) file.
Button Small option stores current small button used by this screen style. You can change logo's graphic using the REPLACE button. The new graphic must be a bitmap (BMP) file.
Button List option stores current button list used by this screen style. You can change logo's graphic using the REPLACE button. The new graphic must be a bitmap (BMP) file.
Button Function Selected option stores current button function selected used by this screen style. You can change logo's graphic using the REPLACE button. The new graphic must be a bitmap (BMP) file.
Button Medium Selected option stores current button medium selected used by this screen style. You can change logo's graphic using the REPLACE button. The new graphic must be a bitmap (BMP) file.
Button Login Selected option stores current button Login selected used by this screen style. You can change logo's graphic using the REPLACE button. The new graphic must be a bitmap (BMP) file.
Button Small Selected option stores current button small selected used by this screen style. You can change logo's graphic using the REPLACE button. The new graphic must be a bitmap (BMP) file.
Button List Selected option stores current button list selected used by this screen style. You can change logo's graphic using the REPLACE button. The new graphic must be a bitmap (BMP) file.
The Font list option from the Edit menu allows to replace the character fonts use in the current Screen style. This font list stores different fonts used by the current Screen style.
When you select this option, the following screen displays.

From the Font list:
Normal Standard option stores character font use by FUNCTION buttons in this screen style. You can change font using the REPLACE button.
Large Standard option stores character font use by NUMERIC buttons such as numeric button from the Login screen. You can change font using the REPLACE button.
Light standard option stores character font use by MESSAGES ON SCREEN. You can change font using the REPLACE button.
Normal list option stores character fonts used by PREFERENTIAL MENU buttons. You can change font using the REPLACE button.
Large list option stores font character use by the FLOOR PLAN. You can change font using the REPLACE button.
Normal fix option stores font character use by READINGS ON SCREEN and CHECK DETAIL ON SCREEN. You can change font using the REPLACE button.
Symbol option store font character use by UP and DOWN arrows in the status screen. You can change font using the REPLACE button.
The Color list option from the Edit menu allows you to replace the preset colors use in the current Screen style.
When you select this option, following screen displays.

From the color list:
Button default option store color pattern for FUNCTION buttons.
Input default option store color pattern for input field such as the SERVER NUMBER display field.
Item new option stores colors pattern for item selected from the order menu but still not order.
Item ordered option stores color pattern for item already order when you go back to an open table.
Modifier new option stores colors pattern for modifier display from selected items but still not order.
Modifier ordered option stores color pattern for modifier already order when you go back to an open table.
Order #1 to #16 options store color patterns for buttons used on PREFERENTIAL SCREENS.
Error option stores color pattern for ERROR MESSAGES display on the POS.
Tables #1 to #16 options store color patterns for table button used on TABLE VERIFICATION screen.
Selected toggle button for list option stores color pattern for toggle button such as DISCOUNT buttons when the promotion is selected.
Not selected toggle button for list option store color pattern for toggle button such as DISCOUNT buttons when the promotion is not selected.
Disable item option store color pattern for items that are not available.
Floor background option store color pattern for the Floor plan background used with the FLOOR PLAN module.
Floor selected table option store color pattern for selected table used with the FLOOR PLAN module.
Floor selected frame option store color pattern for selected table frame used with the FLOOR PLAN module.
Floor smoking frame option stores color pattern for smoking table frame used in the FLOOR PLAN module.
Floor decoration option stores color pattern for decorations used in the FLOOR PLAN module.
Button low graphic option stores color pattern for standard button used by this screen style if the option High Graphic is disabled in the workstation setup module.
Panel low graphic option stores current background screen used by this screen style if the option High Graphic is disabled in the workstation setup module.
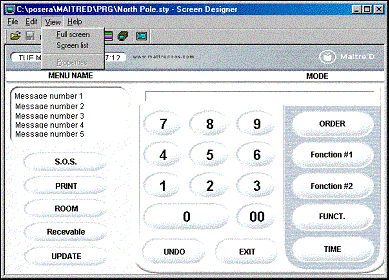
Full screen option from the View menu allows to display the current screen in a full screen window. To go back to normal screen, click on full screen icon from the tool bar menu.
Screen list option from the View menu allows to select from the drop down menu the screen you would like to display from the current Screen style.
When you select this option, following screen displays.
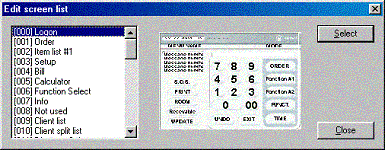
Highlight your preferred screen and click on SELECT button to display it as current screen. This option is useful to verify your latest changes in every type of screen used by Maitre'D software.
![]()